Version: v1.0
Settings
What is the main Purpose
In this part of this system, you will be able to define the major behaviour of your system. It is also where you shall define all of your templates, roles, etc. It is highly recommended that you go through the settings page and define everything that your system shall need before you put this system into use in your company.
The system settings are separated into several subpages. To decrease the complexity of the explanation of the several subpages, we have divided each subpage into it's own section in our user manual.
Overview
Video tutorials
Configuring your outgoing e-mails
Establishing an IMAP connection
Document Settings
License
In this first subpage you can find all the information about the current license that your system is currently using. Additionally you can also change some of the parameters such as if you would like to activate the auto renewal system or not.
Buying or changing your license
If you would like to buy or change the license of your system, you must enter this page in order to do it.
Once you have entered this page, you will need to click on the
Buy/Change License button that is positioned at the bottom right
corner of the page. A representation of the button can be seen below
this sentence.

Once you have clicked on this button, you will be redirected to another page where you will be able to choose the plan that you like to buy or renew.
Company Data
In this subpage, you will define all of your company's data. It is in this subpage where you shall add and modify all of your company's bank account(s) information.
Overview
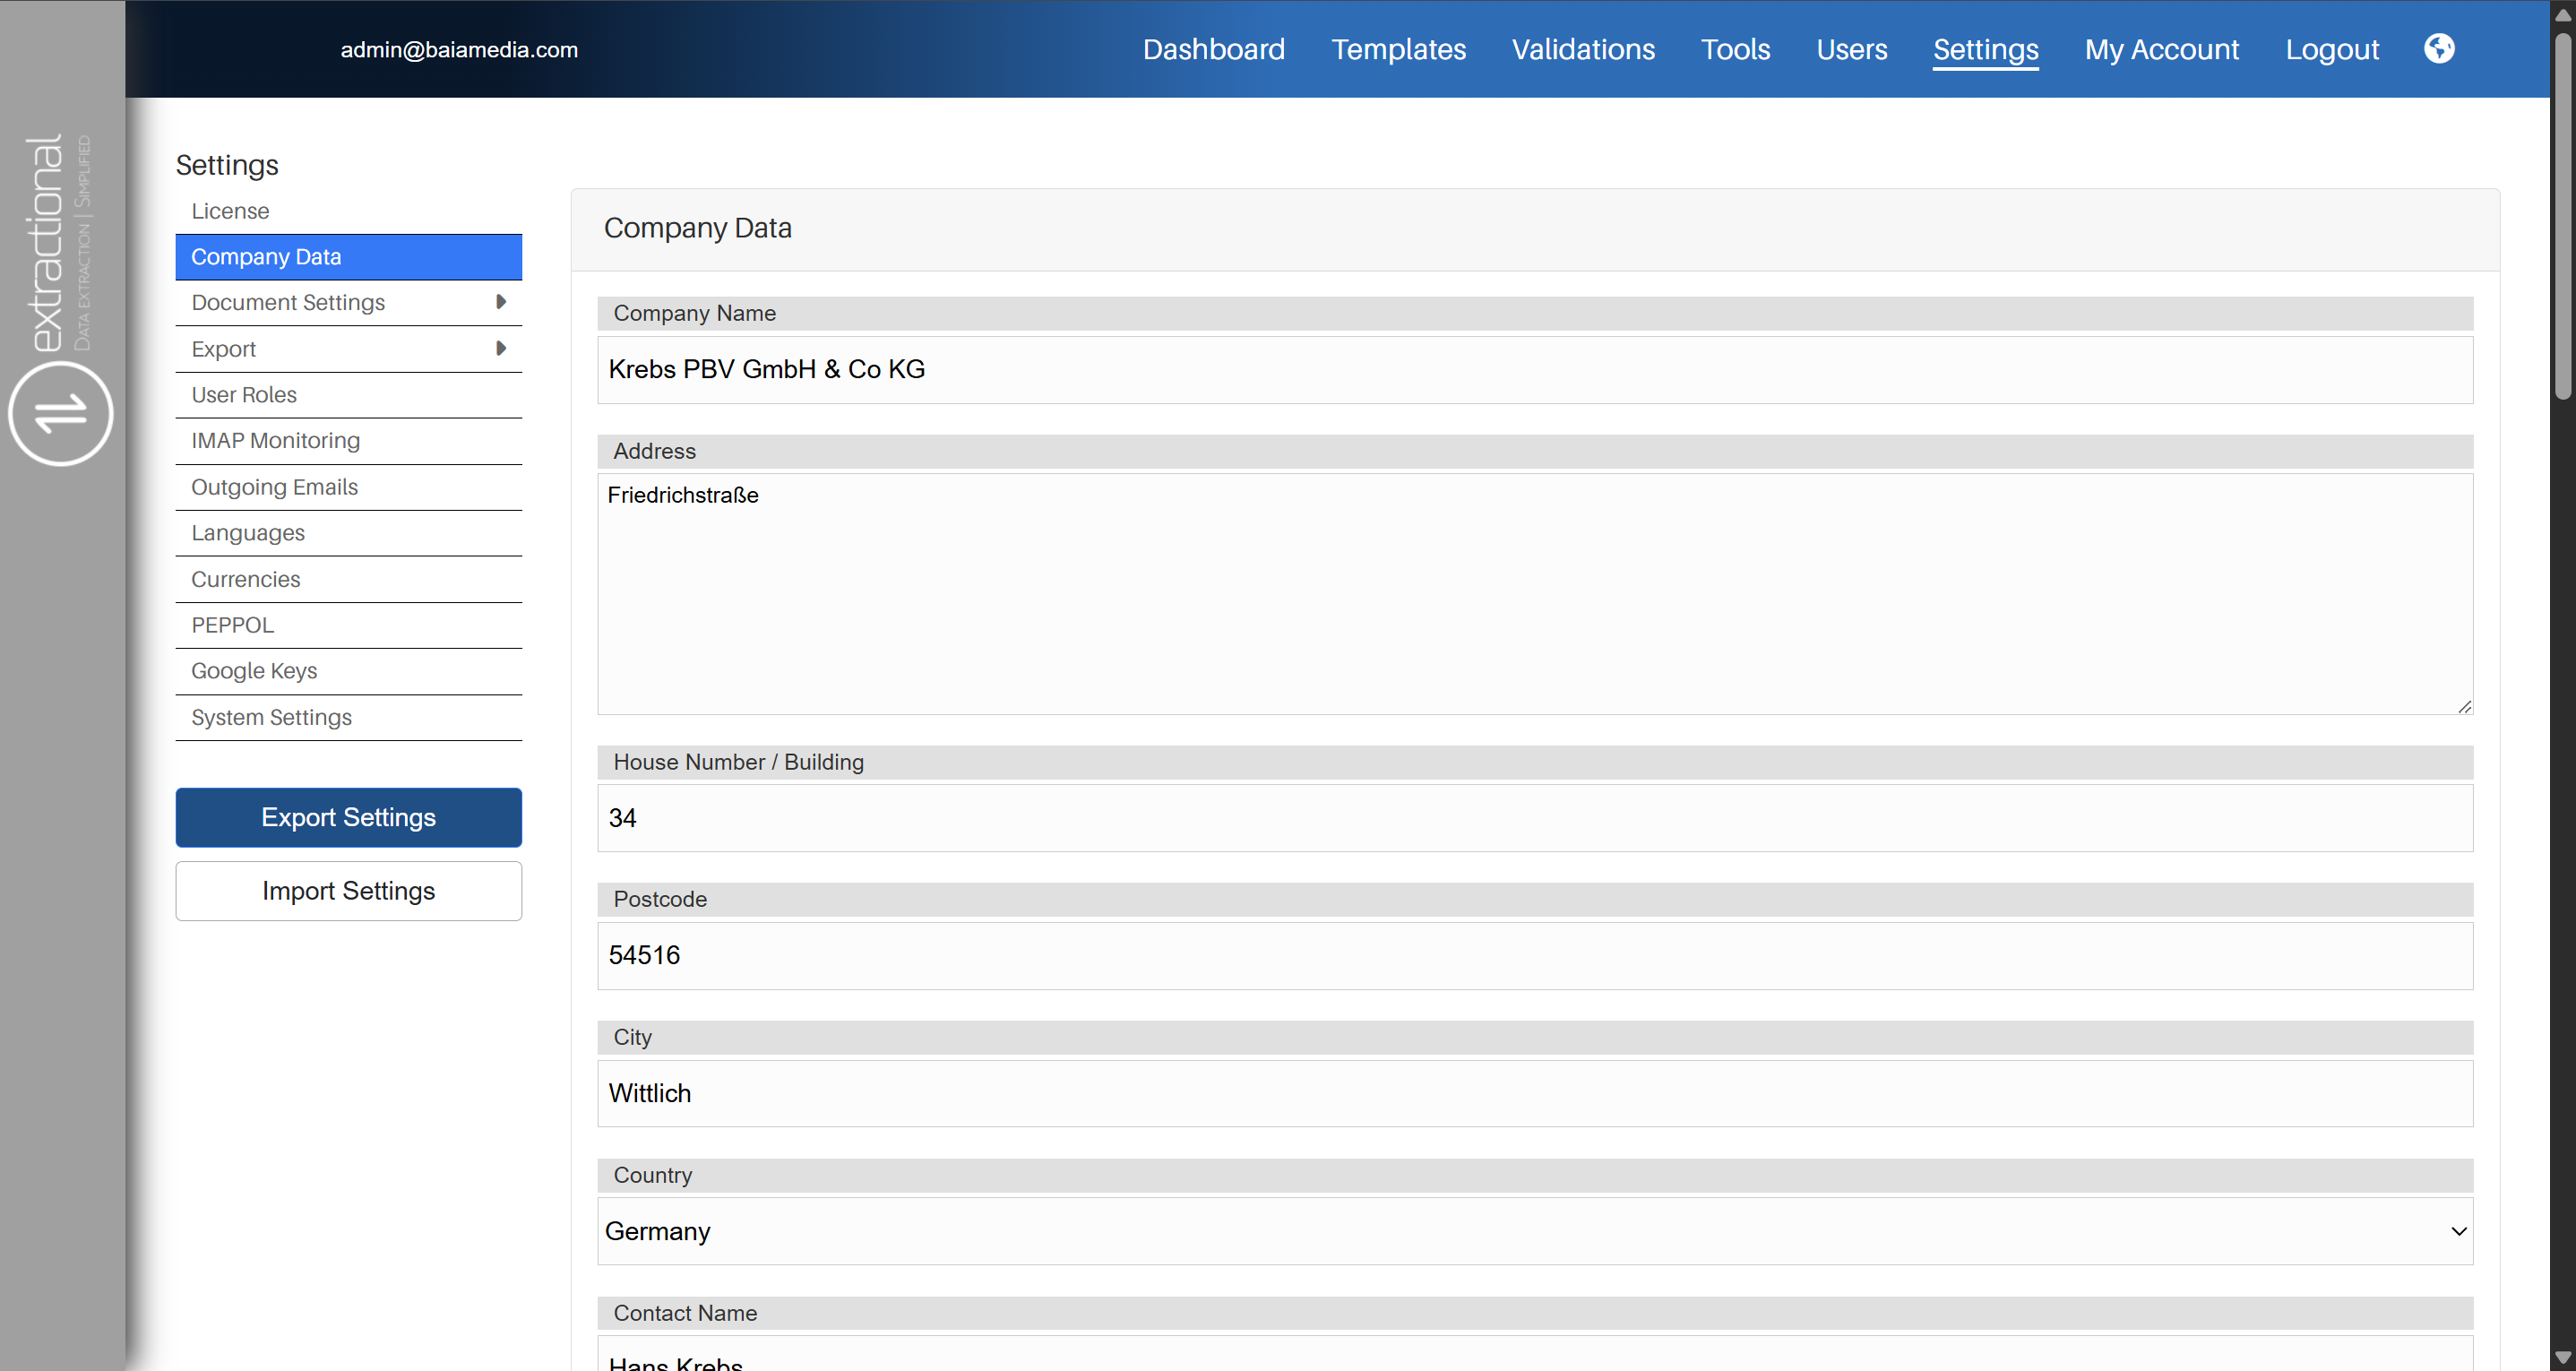
Making some changes to the company(s) information
If you would like to add or change any data related to your company's information, you shall change it by simply clicking in the respective fields that you would like to change the information. You will then have the possibility to change the data by typing the new values or simply selecting one of the options possible, this will depend on the field that you would like to change.
Once you have made all of your changes, you will simply need to submit you changes by clicking on the submit button on the bottom of the page.
Changes in the Bank information subpage
If you would to modify one of your company account(s) or add/remove one, you shall do it in the Bank information tile that is shown at the bottom of the page.
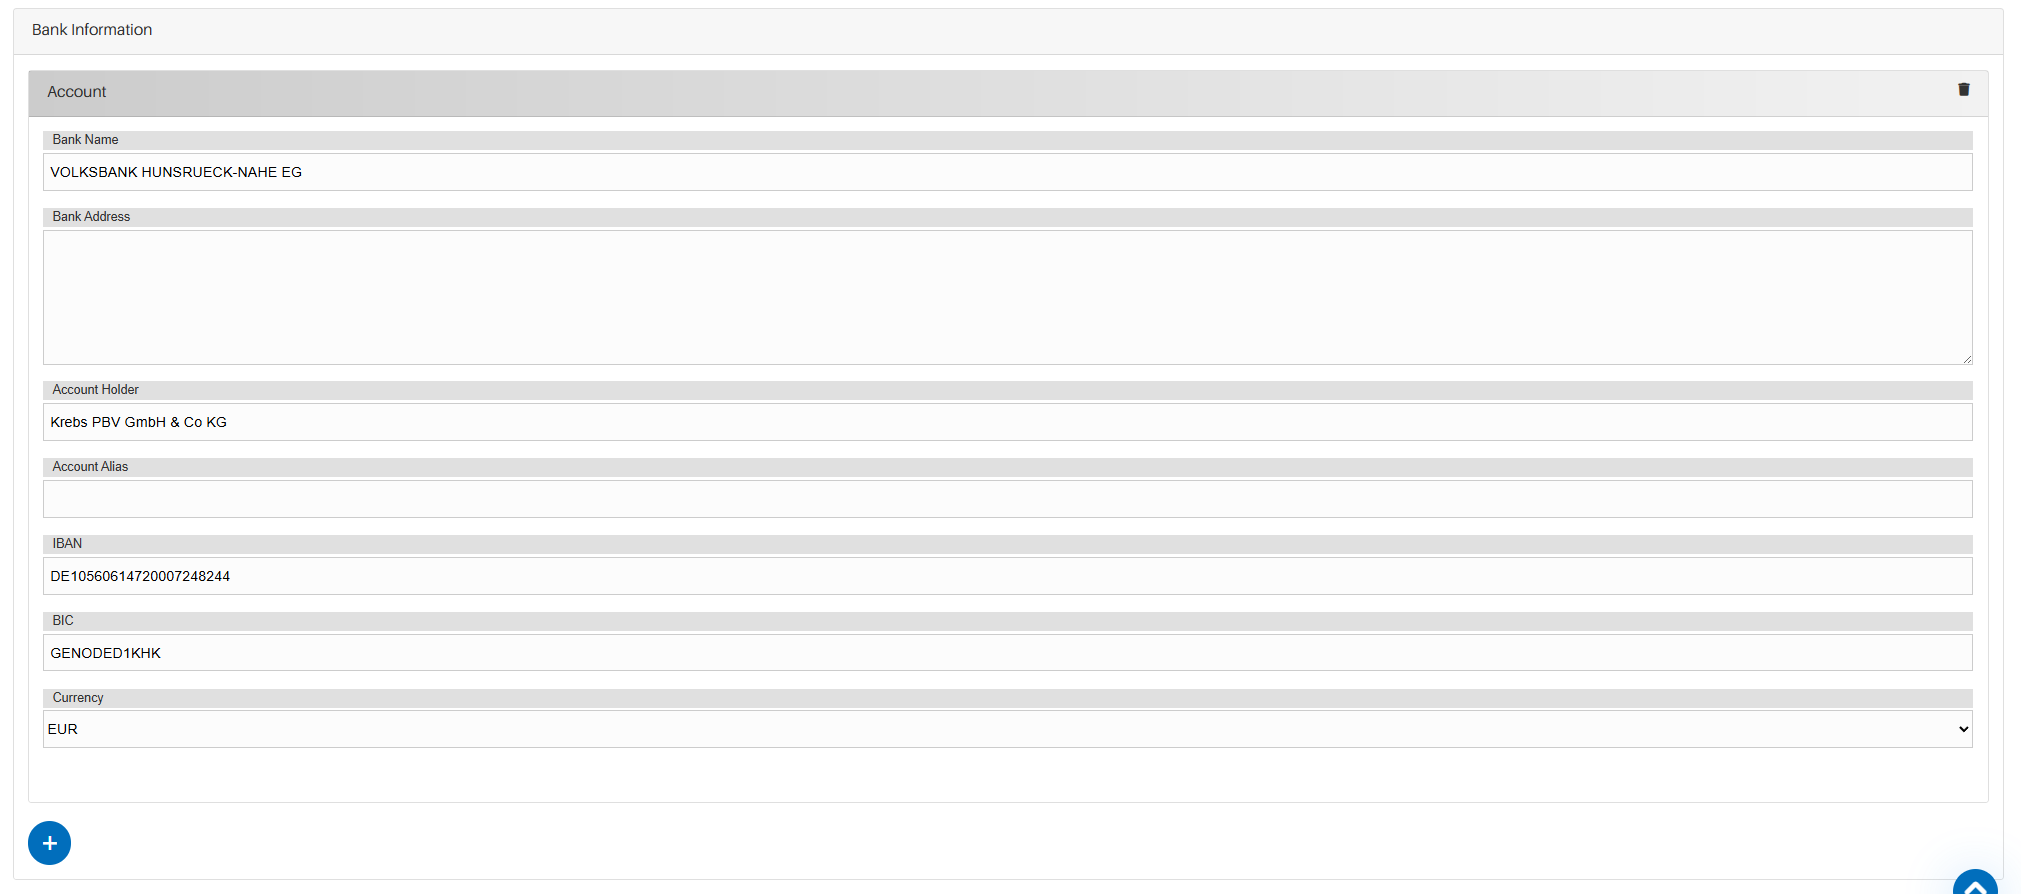
Modifying an existing account
To modify an existing account, you will simply need to do the same manipulation as before (to change the company's information) in the desired field(s) time.
Once all changes have been made, you will only need to click on the
Submit button in order to save your changes.\
Adding a new account
In order to add a new account into the system, you will need to click on the plus icon that is shown on the bottom of the account's page. Once you have clicked on the plus icon, a new account representation tile will pop-out, and you will have the possibility to add all the information of this new account that you would like to add.
Once you have entered all the information for the new account, you will
only need to click on the Submit button to save your changes.
Deleting an existing account
If you would like to remove an existing account, you can do so by clicking on the trash bin icon of the respective account, and the account will be removed. The trash bin icon can be found on the top right corner of the respective account representative tile.
Document Settings
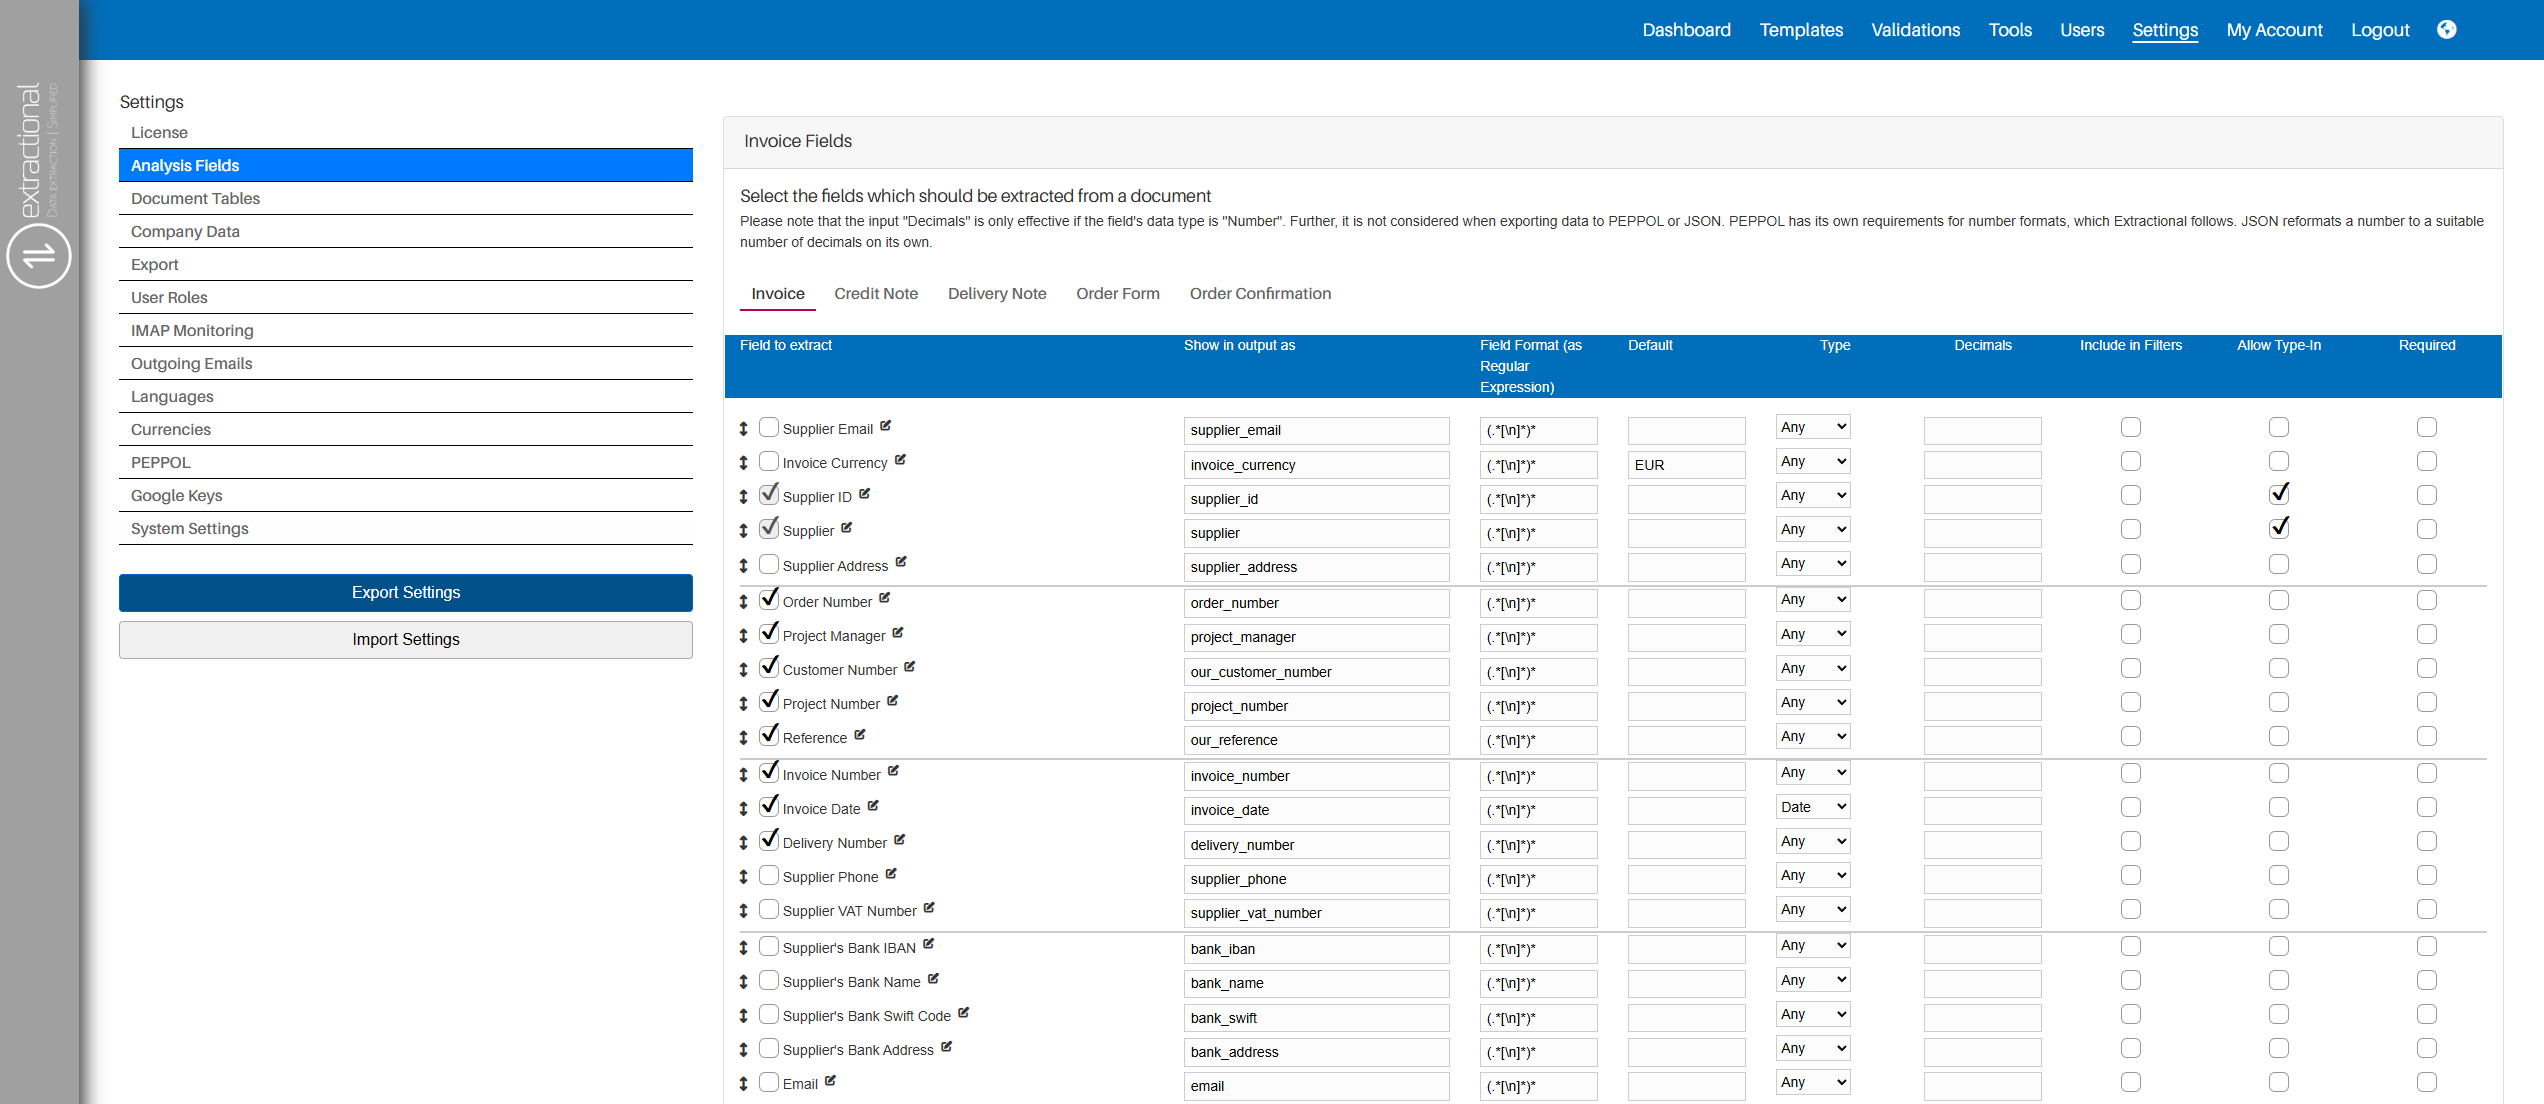
Analysis Fields
In this subpage of Settings, you can define all the data that shall be extracted from each type of document that is being read.
Overview
How to navigate and define all fields
Firstly, to navigate through the system, use the different tabs that can be found at the top of the page. These different tabs allow one to navigate between each type of document will be defined for extraction.
Visualizing all elements that are being extracted
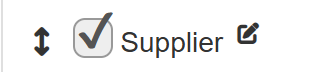
To visualize all the elements that are currently being extracted from the system, you can do so by analysing all the elements that do have the select box selected. To help you visualize what a selected element is, you can find a visualization of an element that is being extracted in the system.
Understanding the field's definition
To understand how a certain field extraction unit has been defined, you will need to understand what each category that defines a field abstraction is.
Each field has the following elements:
The general field name will define the name that you will see in the system's graphical user interface. This name is defined in each language of the program.
The output name is the technical name that will be used further on to create XML relations and to implement on further templates or automations. This name must be unique and must be single-worded.
The field format defines the format of this entity with regular expressions. It is in this case where you will be able to define the length of each field as well as define the type of intput the field shall always receive (words,numbers, etc.).
The default case is where you are able to define a default value for your entity in case if the system does not find any value.
In the type case you can define how this input shall be identified in our system. For example, if you would like that our system identifies these entities as data, here you shall define it.
In case you are dealing with numbers, you will also be able to define how many decimal numbers are allowed in the system. This can be easily defined in the decimals box. Additionally, if our system receives as an input a number with more decimals than what you have defined, the system will automatically round the number to the number of decimals allowed.
For the selective option, you will be able to define if this field shall be included in filters, meaning that if selected, you can use it when filtering. You will also be able to define if you allow type-in,in other words, allowing to use that manual selections can also be applied for that field. Moreover, you will also be able to define if that field is required or not, meaning that once a field is required, it cannot be left blank.
Now that you understand the definition of a certain field, you can now define all the fields that your system shall extract, and if none of the fields corresponds to what you would like to extract in the documents, you can always create more fields by clicking on the plus icon at the bottom of the table.
Difference between the two tables
There are two tables where you can define your fields. It is important to define your fields in the correct table. We will now explain what each table means.
In the first table, you define all the fields that the system will extract from each document. Generally, here you shall define all the different fields that are more general for the whole document, such as the client name or the total sum to pay.
In the second table, you shall define all the different fields that are specific for generating Peppol compliant data. In other words, you shall only define all the fields that you want in your table of items of products in the document.
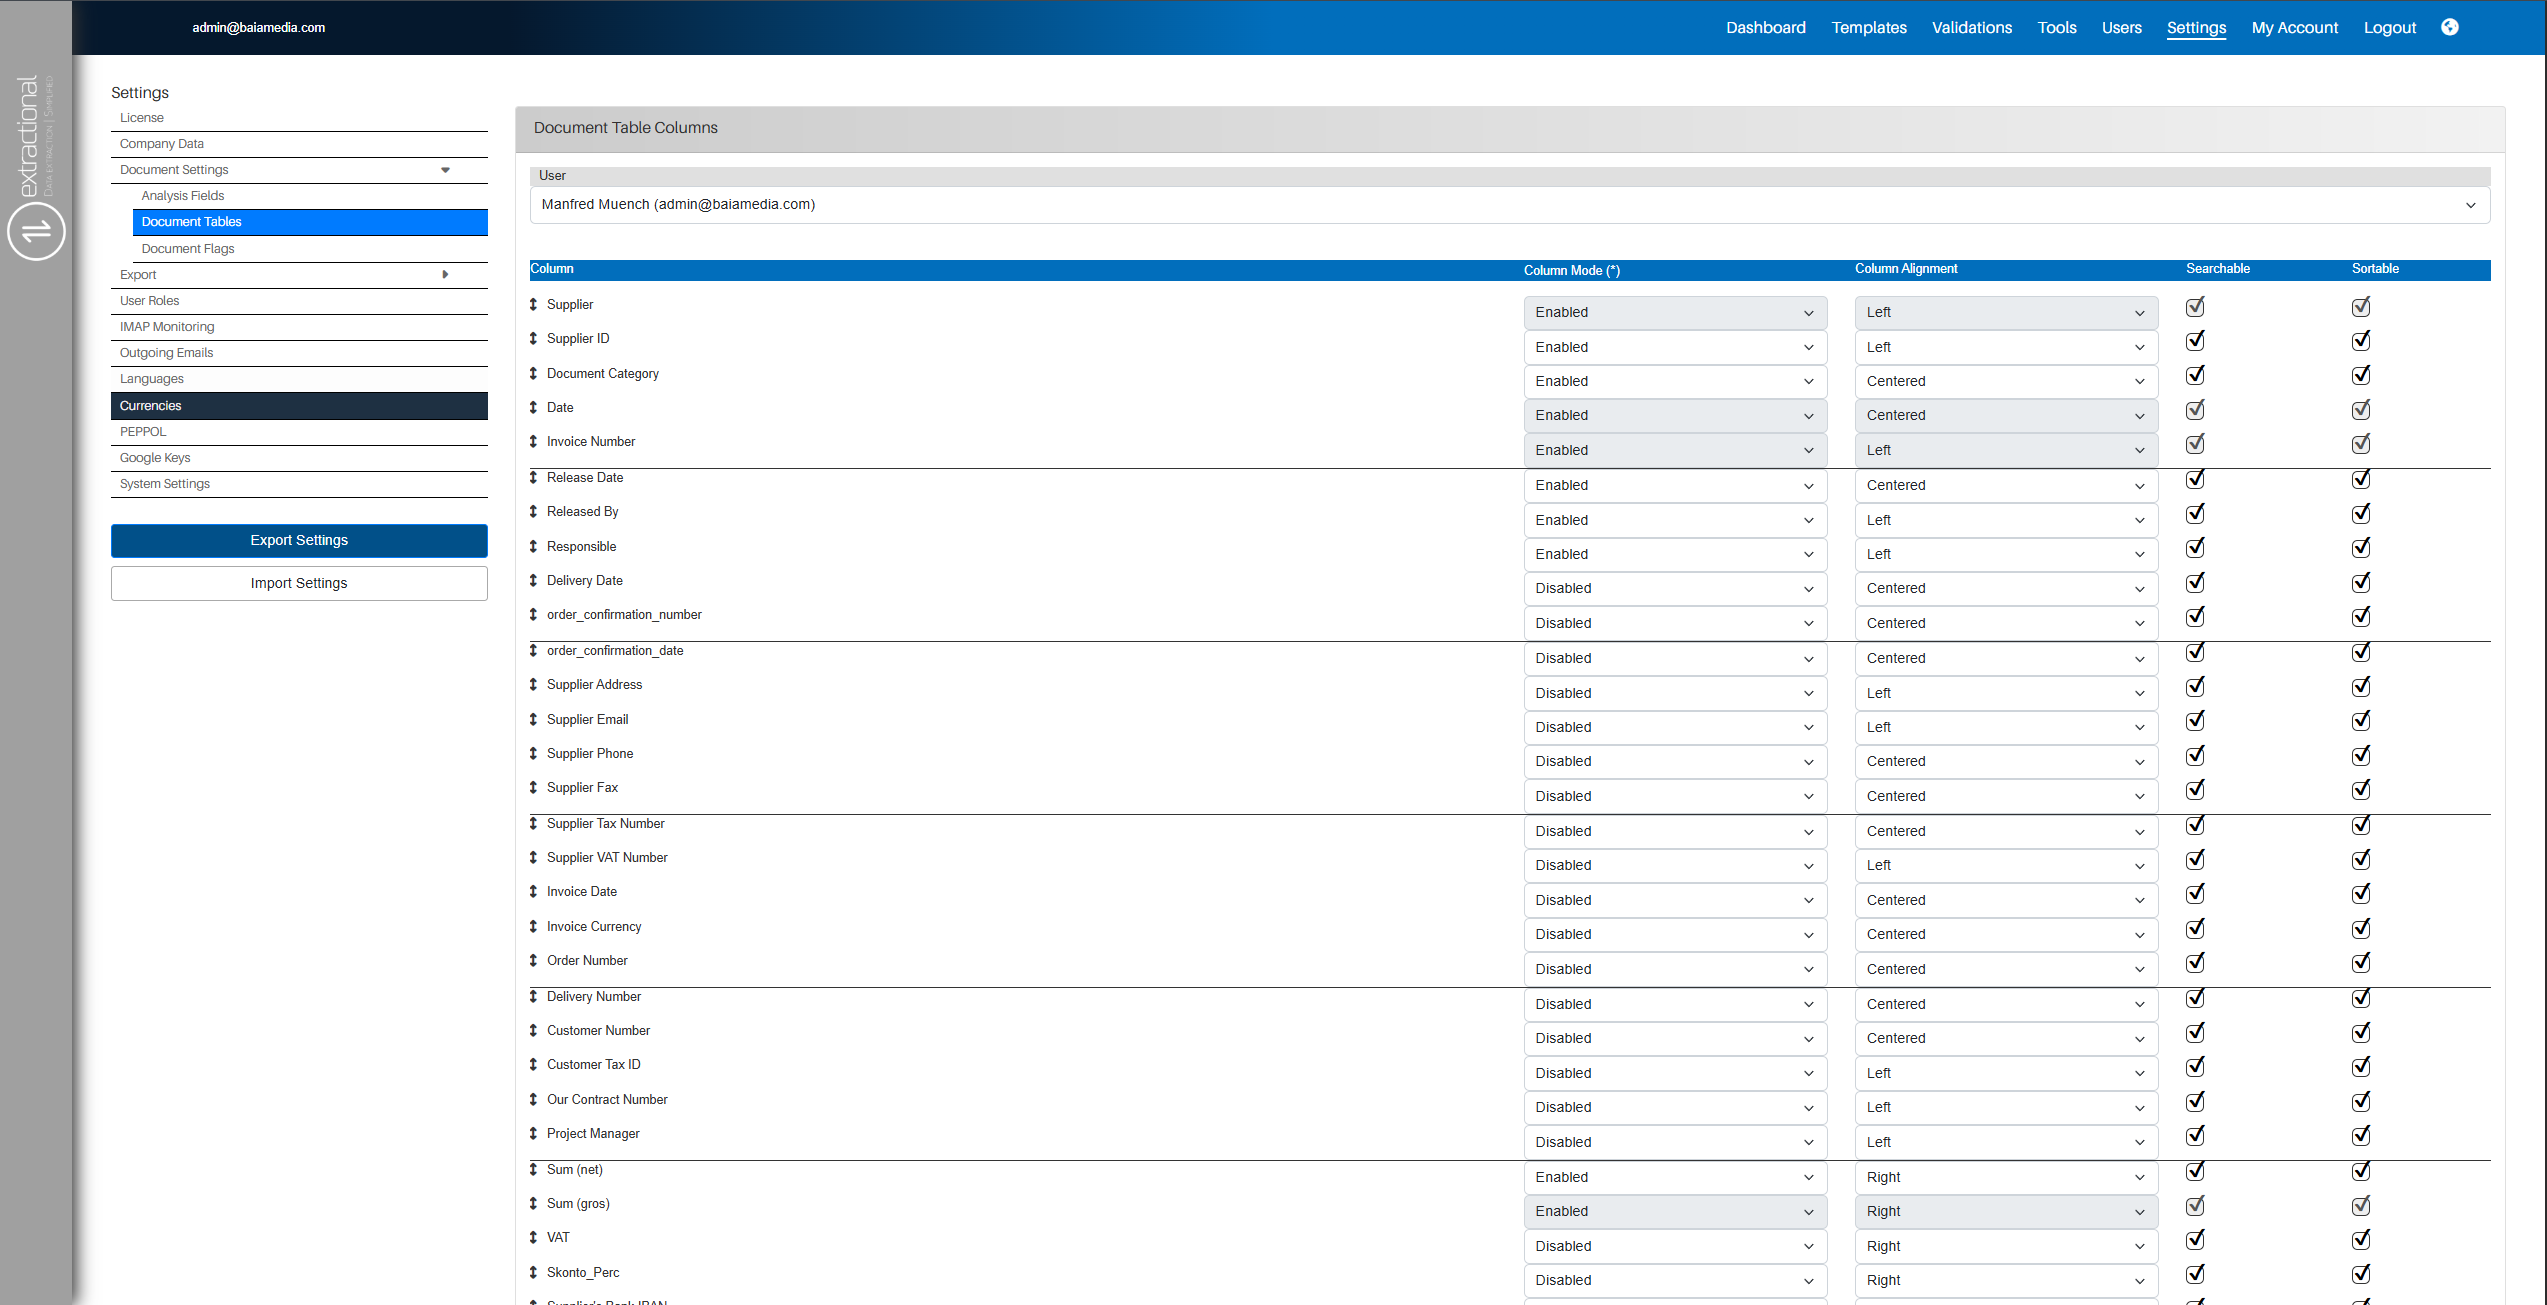
Document Tables
In this subpage of the settings you will be able to define what you would like to have visible in the document table the is situated in the Validations page.
In this page you will be able to define how each one(s) document page would look like.
Overview
How to interact in this page
As you can see, this page is composed of a table full with all information that will be extracted in the system. In each one of the fields, you will be able to choose how it shall be visible in the documents page. We will now explain what each column actually does.
Note
Some of the fields are already predefined and you will not be able to make any changes in it.
Column Mode
In this column you will be able to define what all the the visibility for each field. You have three options:
-
Disabled: this field will not appear at all in the table and will not be chosen as an search criteria when searching for a file.
-
Hidden: this field will not appear at all in the table, but it will be considered when searching for a file in the search bar.
-
Enabled: this field will appear in the table of documents and will also be considered when searching for a file in the search bar.
Column alignment
In the following column, you can specify how each file should be aligned in the table.
Note
You only need to define this column if you have defined the Column
mode as Enabled.
You can choose between the following options:
-
Left alignment
-
Centered alignment
-
Right alignment
Selective columns
Note
There are two selective columns for each one of the fields. These shall
only be put into consideration once the Column mode is set to
Enabled.
The Searchable selective column allows you to define whether the field is considered when searching for a document in the search bar.
The Sortable selective column allows you to define whether the field can be used to sort the document's list or not.
Document Flags
In the following page, you will be able to define and modify all of your document flags.
Overview
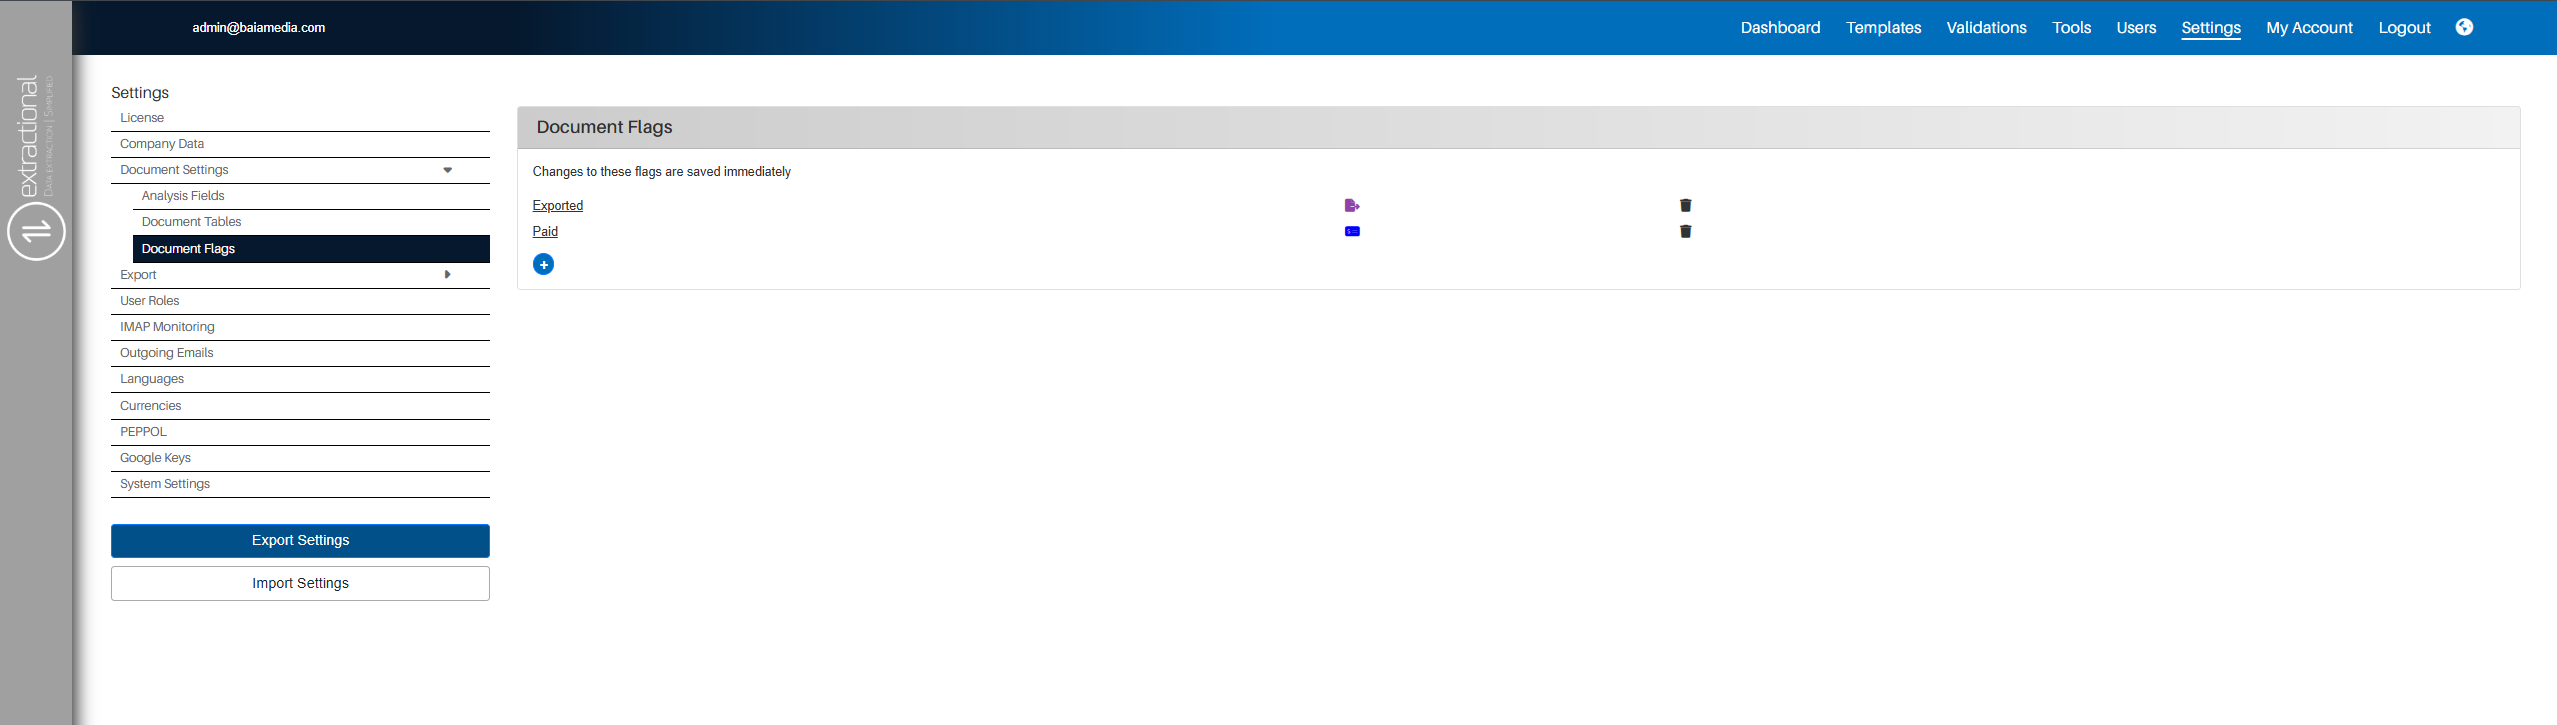
Understanding the page layout
This page represents all the document's flags in a table. In this table, each flag is represented in a row. Modifying, creating new flags, or deleting existing flags can be done by clicking on several buttons or icons. Each functionality shall now be explained in the following sections.
Modifying the current flag(s) list
In this part, you will learn to modify your current company(s) flag list.
Note
If you would like to change or add flag automation together with exportation, you shall define it in the export page.
Adding a new flag
In order to add new flag into the system, you will need to firstly click on the plus icon that can be found on the bottom of the page. Once clicked, you shall be represented with the following window.
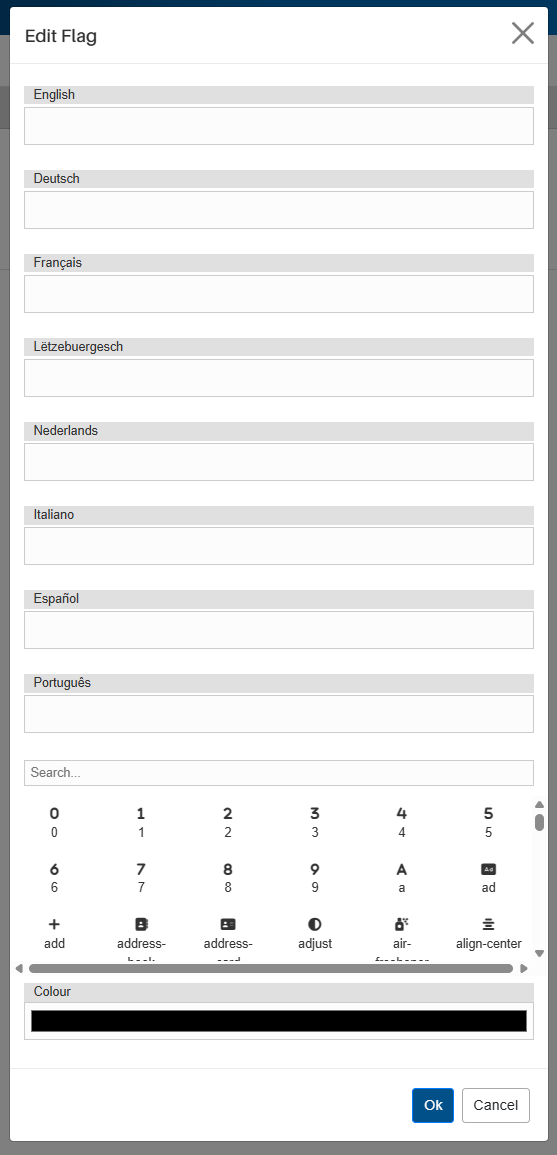
You will now need to insert the name of the new flag in all the corresponding languages as well as defining a corresponding icon with the respective color.
Once you have defined all the different fields, click on the Ok
button at the bottom of this window. If the manipulation has been
successful, you shall be able to see the new flag in the flag(s) list.
Editing an existing flag
If you would like to modify an(some) element(s) of an existing flag, you will need to click on the flags name that you would like to modify in the respective list.
Once clicked, you will be represented with the same window as for creating a new flag but this time with all the selected flag's information. You can now modify all the desired information in the respective fields.
Once all the modifications have been made, you will need to click on the
Ok button at the bottom of the page and all the changes will be
saved in the system.
Deleting an existing flag
In order to delete an existing flag, you will need to click on the delete icon of the respective Document. This icon can be found at the end of each document flag.
Once clicked on the desired flag, the flag will be successfully removed from the system.
Export
Default export Values
In this page, you can define the default values in the system's export menu.
Overview
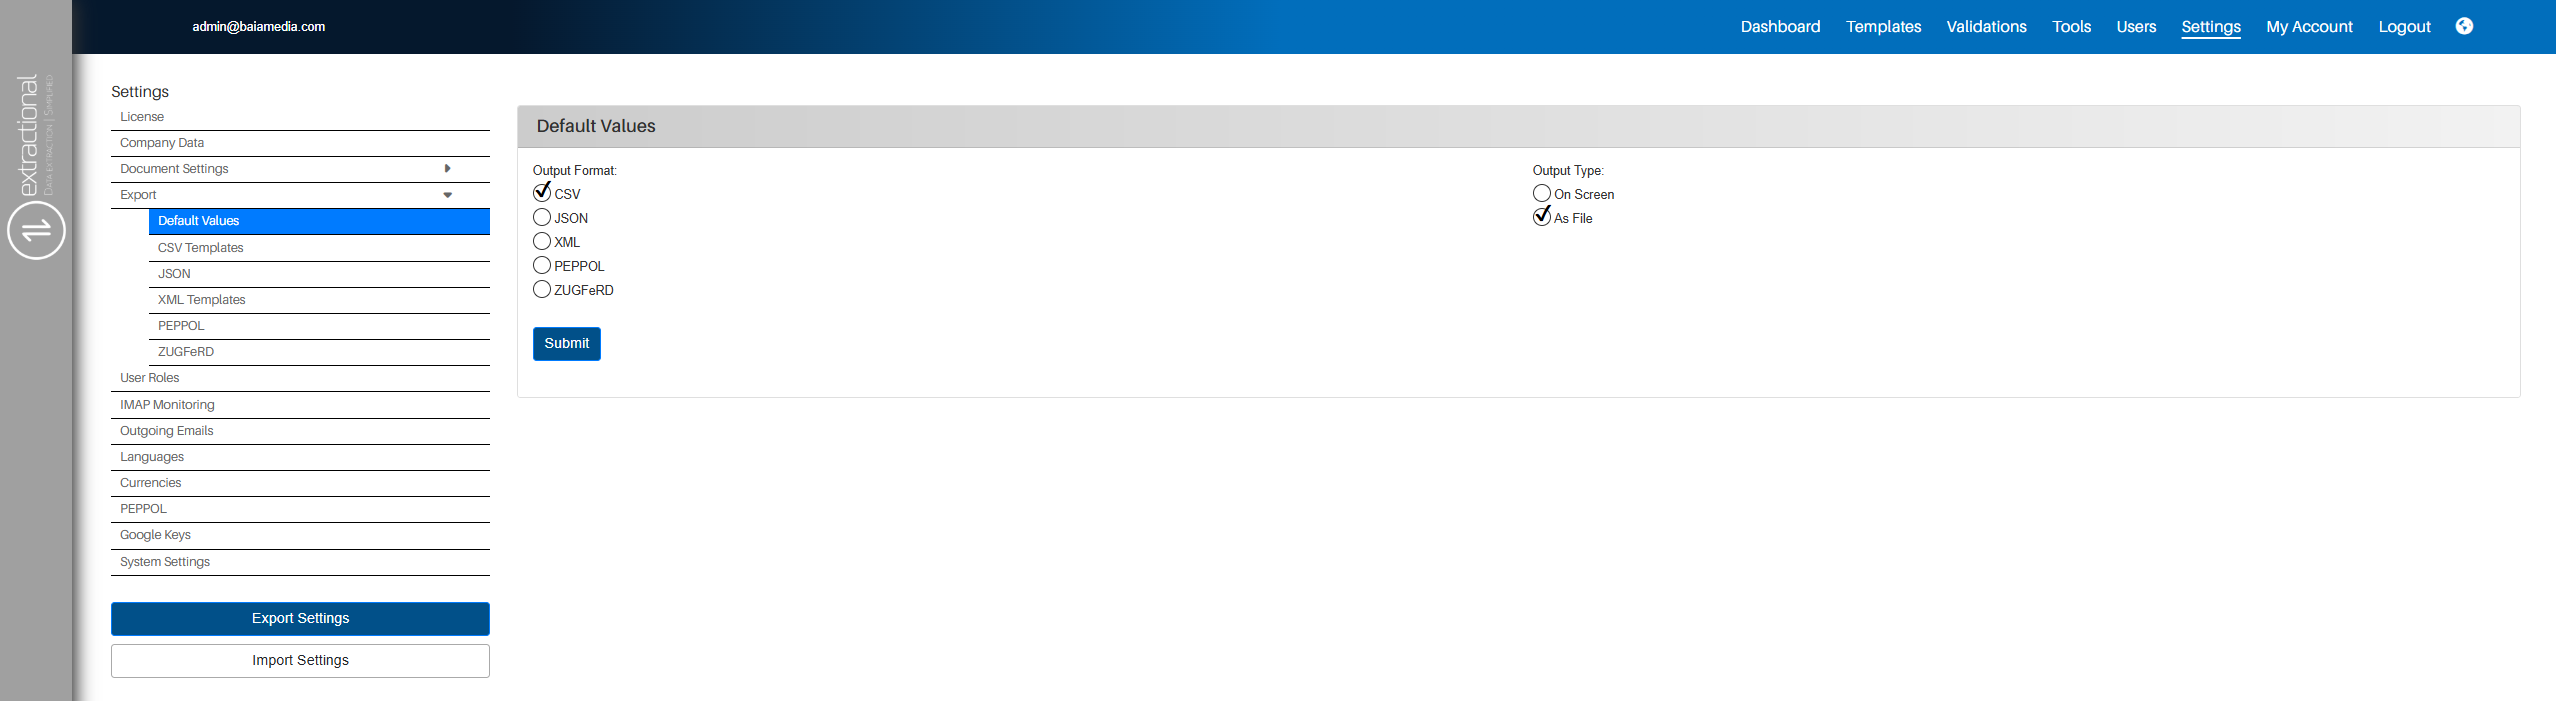
Defining the new default values
If you would like to change the default values for exportation, you will
need to simply select the desired values in this page and click on the
Submit button at the bottom of the page.
Export CSV Templates
This page is responsible for defining all the different CSV templates available in the system.
Overview
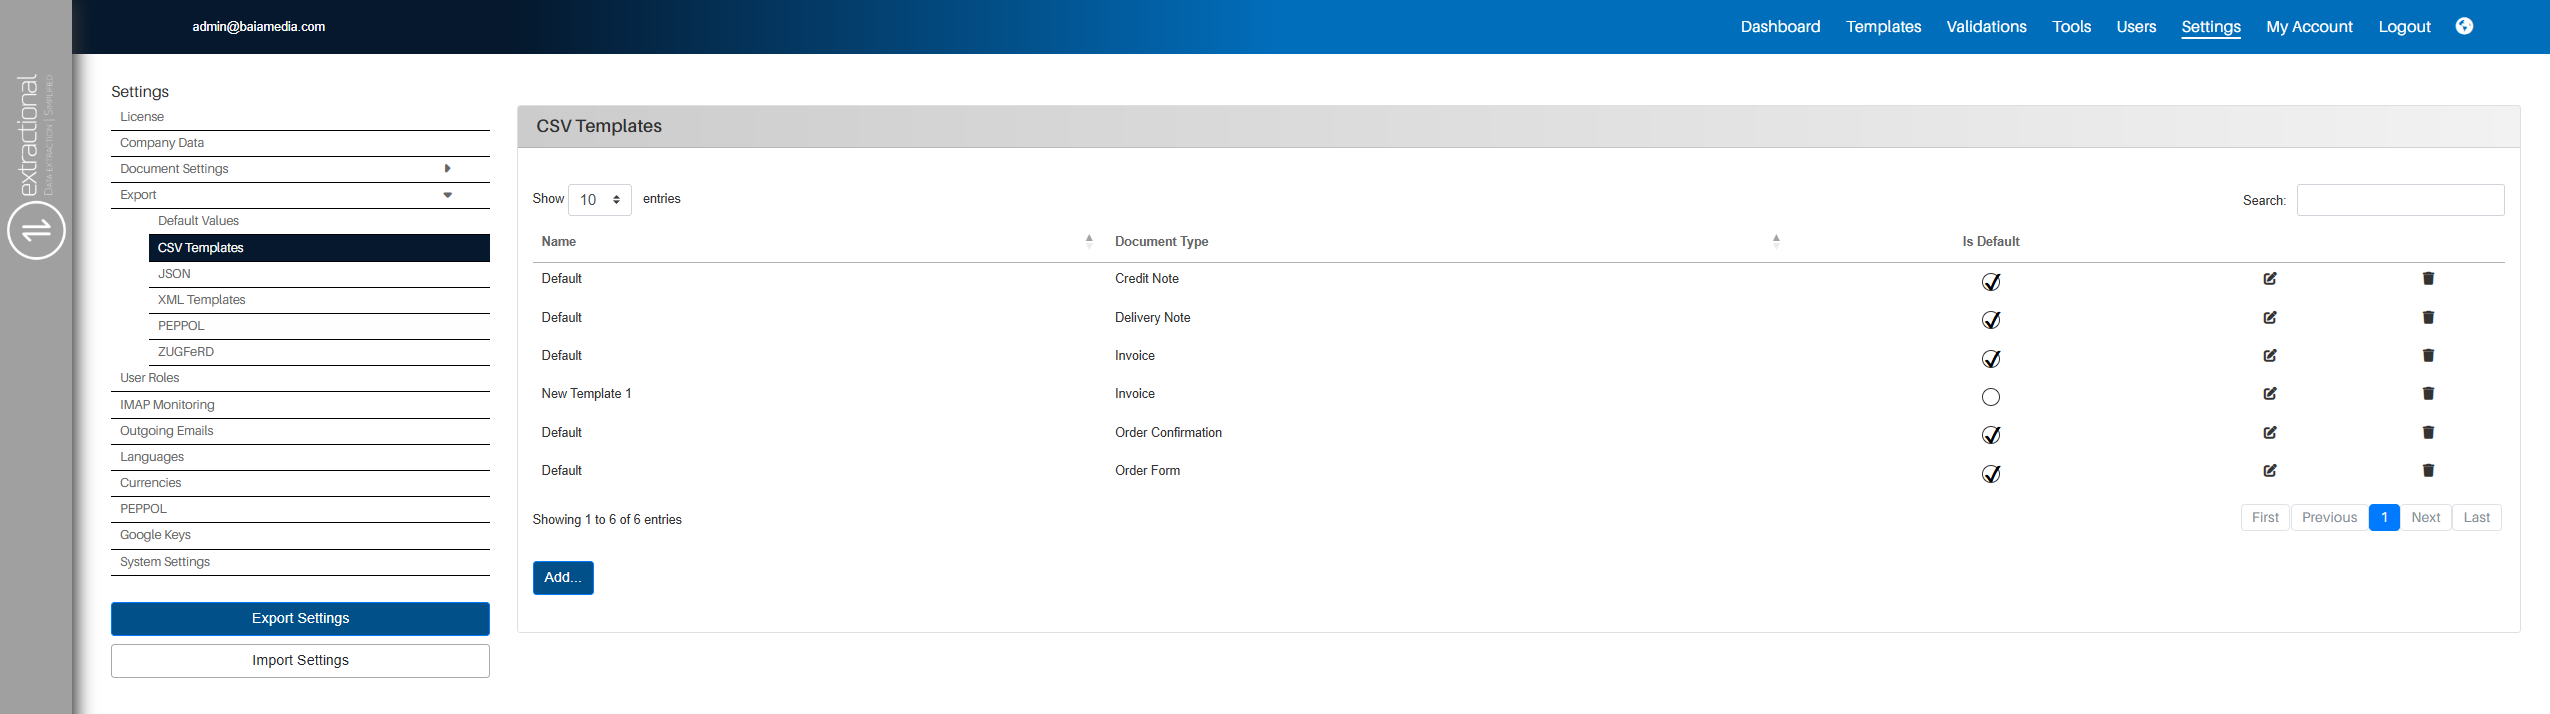
Navigating through the page
This page follows a similar layout to the validations page. Each template is represented in the table as a row. You will be able to define how many templates you would like to have per page in the respective selective field. You can change between pages on the navigation buttons.
You can also look for a specific template by typing it's name or document type in the search bar.
Adding a new template
In this part, you shall find a guide on how to add a new CSV template from scratch.
The first thing to do will be to click on the \"Add...\" button at the bottom of this page to trigger the system that you would like to add a new template.
Once clicked, you shall be presented with the following additional information on the page.
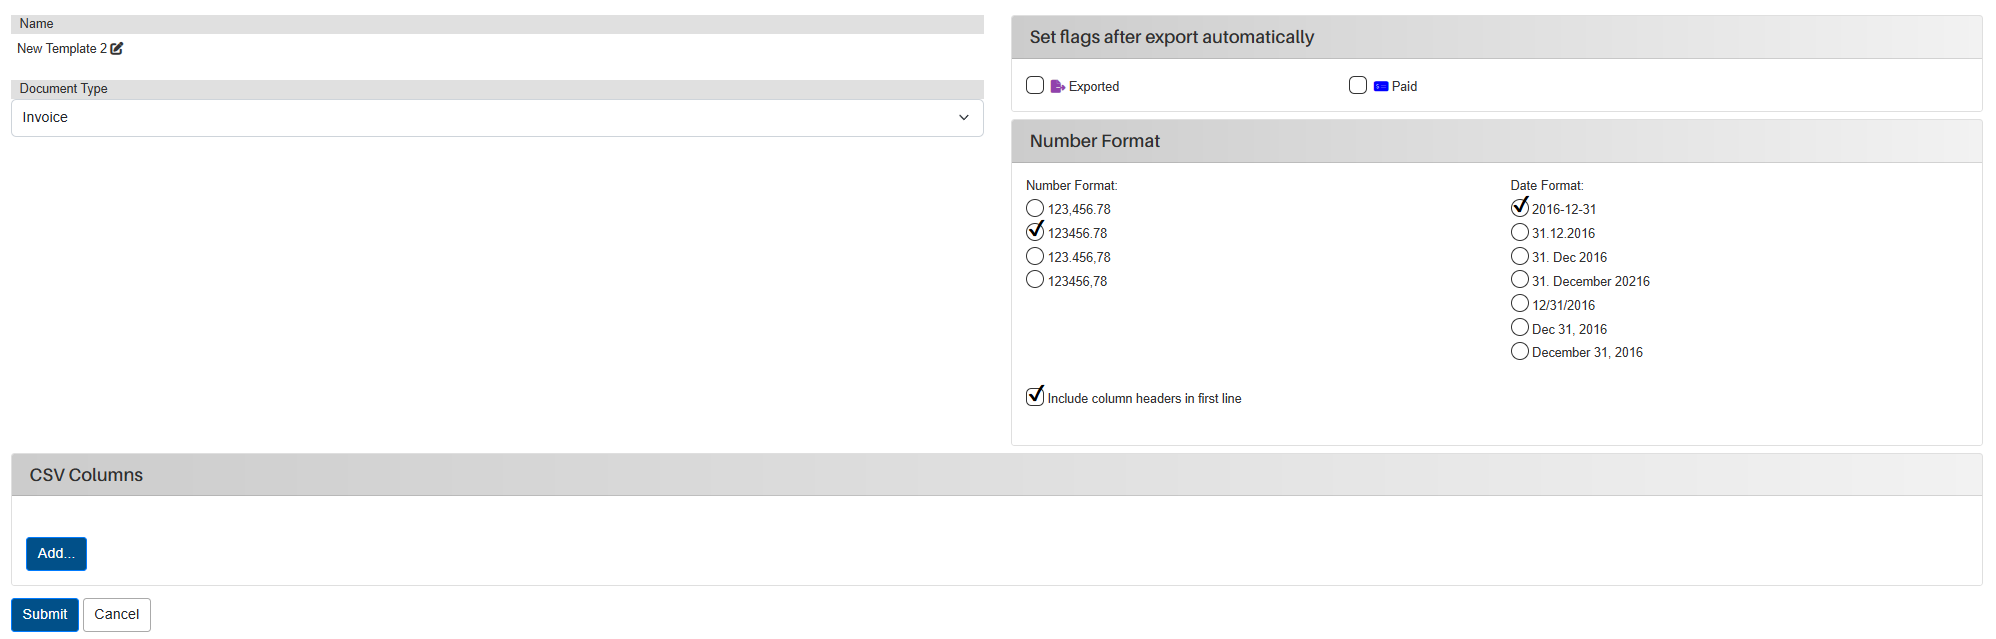
You will now need to define all the general characteristics of the new template. Once you have defined all the different general characteristics of the new template (Name, Document type, Set flags after export, Number format), you will need to add all the columns for exportation.
All the different columns of a certain CSV template are available in the
CSV Columns tile at the bottom of the page. In order to add a new
column into the system, you will need to click on Add... button and
you should be presented a new column entity.

You will not be able to define the field value that shall be inserted in that column as well as to define the columns name.
In addition, you will be able to change the order of the columns by grabbing (left clicking on the field) the field that you would like to move and placing it where you would like.
Once all the information has been added to this new template, you need
to click on the Submit button at the bottom of the page to save this
new template in the system.
Editing an existing template
In order to change an existing template, you will need to start by clicking on the edit button of the respective template.
The system will then display all relevant details for that specific template using the same layout as when creating a new template.
You will now be able to change all the different characteristics of that template as well as changing all the different columns of that template. The columns manipulation will work in the same way as when creating a new template.
Additional features
-
Editing templates
In order to remove on of the templates, you will need to click on the
deleteicon that is visible at the right side of each template. After clicking on the remove icon, the template will be successfully removed. -
Defining default templates
You can also define all default templates for each type of document (Invoice, Credit Note, etc.). To do so, you will need to select, in the
is defaultcolumn the template that you would like to have as default. The previously default template for that type of document will be automatically unselected.
Export JSON
In this page, you will be able to define all automations with flags for all JSON exportations.
Overview
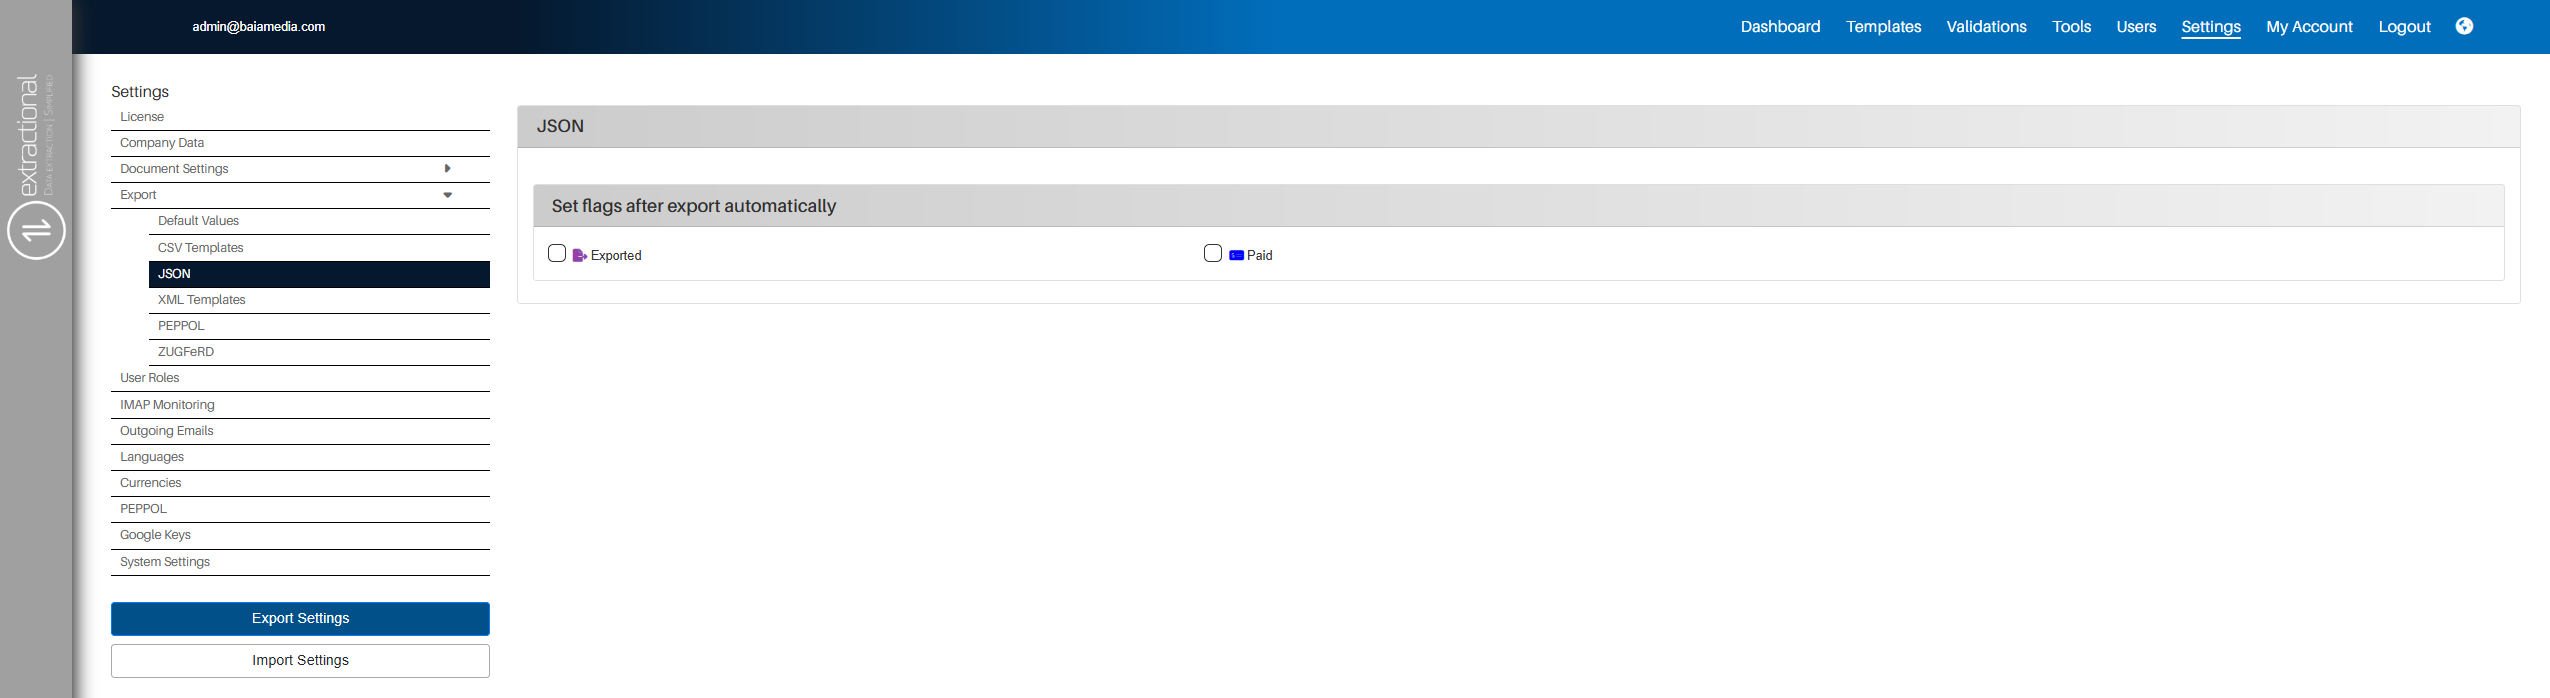
Setting flags after exportation
You can automate the system to automatically set a(some) flags to a certain document once it as been exported as a JSON file. This can be done by simply selecting the flags that you like to be added once a document as been exported as a JSON file.
Export - XML Templates
On this page, you can define all the XML templates available in the system. Navigation works in the same way as on the Export -- CSV Templates page, with the main difference being the Template Data section, which appears when editing an existing template or creating a new one.
Template Data
In this section of the page you will be able to define the main template format and items that shall be used for exportation afterwards. The template shall be written in XML and if you would like to refer to one of the system's fields, you shall use the following notation \@some_field@
There are three main templates that shall be defined:
defining all information that shall be released regarding the main content of the document.
defining all the information that shall be released regarding each item of the document. This part will only be activated if you are exporting an Peppol compliant document.
defining all the information that shall be released for XML payments (typically SEPA transaction XML files).
Export PEPPOL/ZUGFeRD
On these pages, you can define all flag-based automations for PEPPOL/ZUGFeRD exports. The layout and navigation are identical to the Export -- JSON page. For a more detailed explanation of how these pages work, refer to the corresponding section of this manual.
User Roles
In this page, you will be able to define all the different User roles that you would like to have in your system, as well as defining the permissions for each one of the users.
Overview
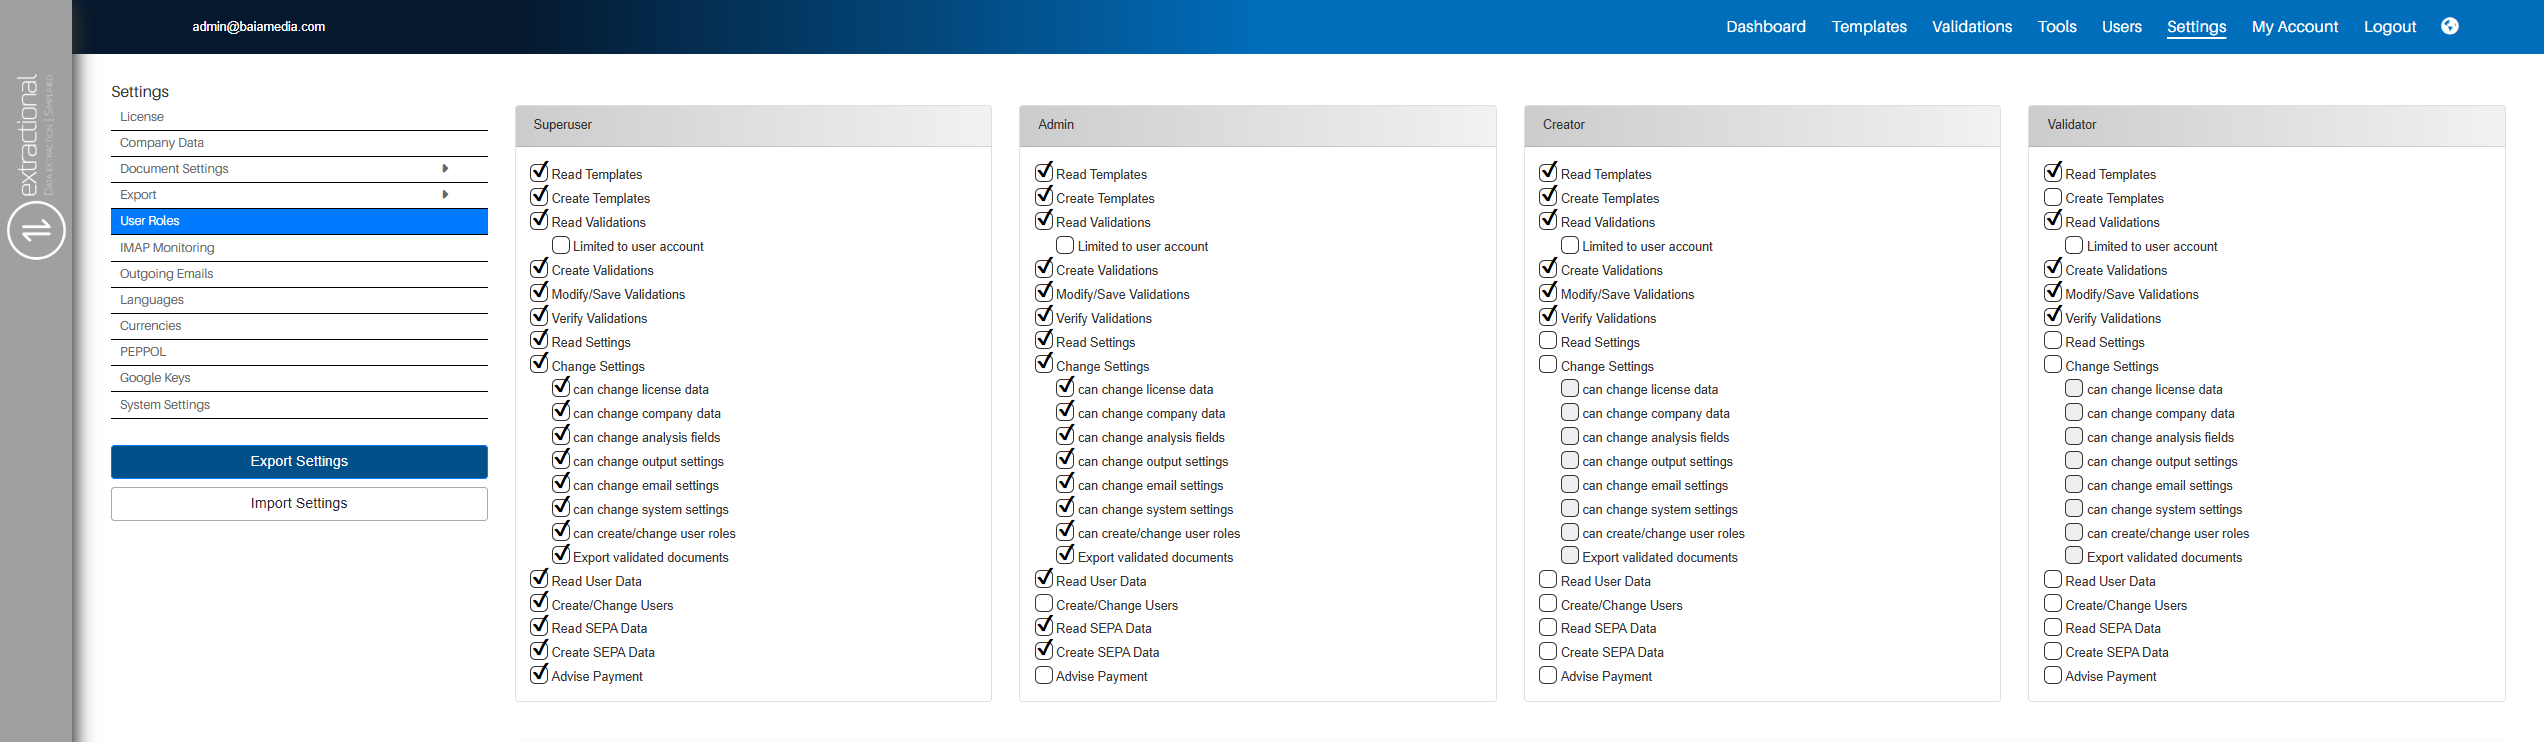
Navigation through the page
On this page, you will find a set of tiles, each representing a user role. Inside each tile, you can see all available permissions in the system, along with the corresponding selection boxes. The selected options indicate the permissions currently assigned to that specific user role.
General manipulations
-
Add a new user role
To add a new user role in the system, click the
"New..."button located at the bottom of the page. A window will appear, prompting you to enter the name of the new user role in each language supported by the system. Once completed, click the"Submit"button to confirm. -
Changing permissions of a user role
To define or modify the permissions of an existing user role, simply select or deselect the relevant permission(s). After making your changes, click the
"Submit"button at the bottom of the page to save them. -
Renaming user role
To rename an existing user role, click the edit button in the top-right corner of the corresponding role's tile. A new window will open, allowing you to update the role's name in each language. When finished, click the
"Submit"button at the bottom of this window to save the changes.
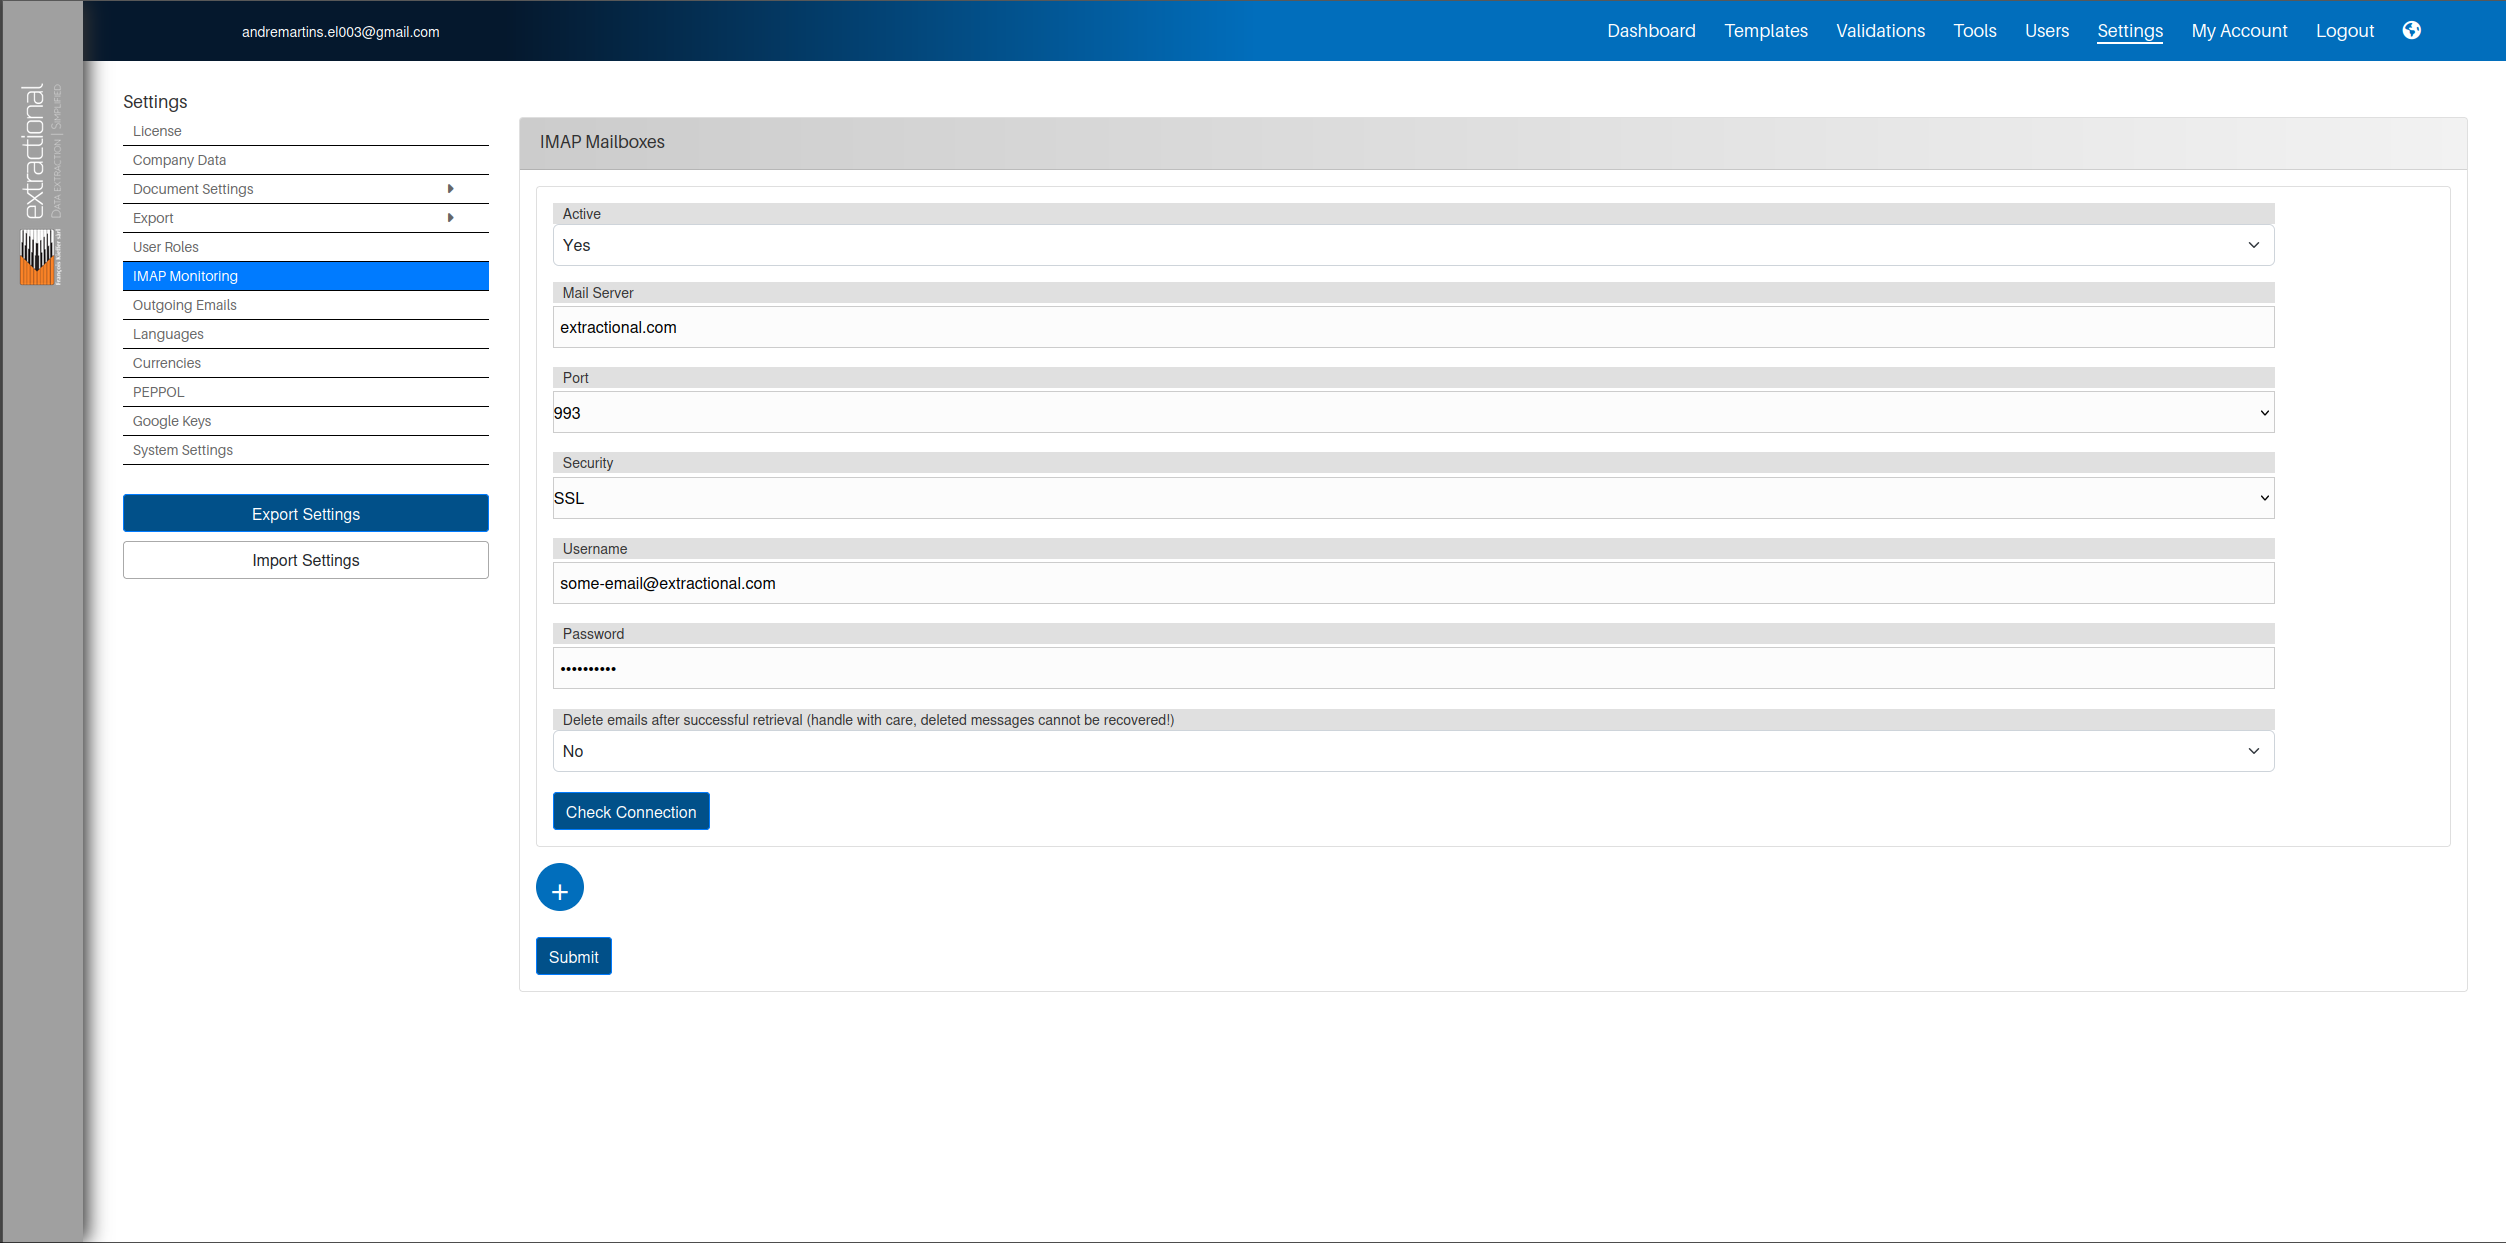
IMAP Monitoring
In this page, you will be able to define the IMAP connection with your email(s) so that all the documents that will be received in your email will be directly inserted into the system.
Overview
How to set a new e-mail in the system
Important
This part will highly depend on your email domain. If your domain allows IMAP connection with no additional authentication, please follow the following the first part of this section. If, however, your system needs additional OAuth authentication, please follow the second part of this section.
1. Adding an email with simple IMAP connection
For a simple IMAP connection you shall simply enter all of your e-mail's coordinates, such as mail server and. You also need to enter all your email and password.\ Once entered all of your credentials, you will need to define weather you would like all e-mails to be automatically deleted or not. This shall be handled with care since deleted email messages cannot be be recovered.\ You can now check if your system succeeds connection by clicking on the \"Check Connection\" button, and a new window will pop-out showing you the respective result.
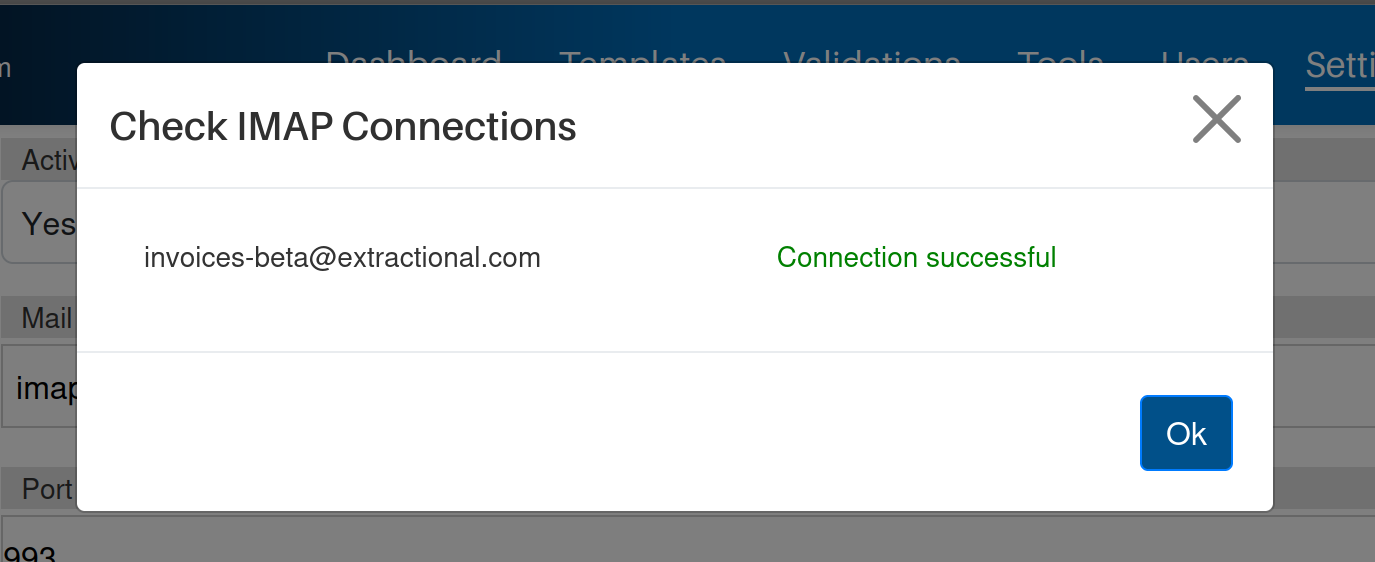
Example when connection is successful
Info
If you are having issues trying to connect to the system, first verify if your email provider allows simple IMAP monitoring. A typically issue is also the Port number and Security protocols that are not correctly defined.
Once your email has been successfully added, you will need to click on
the Submit button at the bottom of the page and your changes will be
saved.
2. Adding an e-mail with OAuth connections
Note
Currently, our system only allows OAuth connection with Outlook emails, any other domains that need this type of connection will will not work in our system unfortunately.
The first step will be to trigger the system to create such a connection. To do so, you will need to enter the mail server and deselect the box, meaning, for example, right-clicking outside the box.
The system will automatically detect if your domain needs OAUth connection and if so, you will need to insert the additional information that is needed for this type of connection.
For Outlook accounts you will need to add the following additional information that is listed bellow.
You will then need to fill all the rest of the fields as for a simple IMAP connection e-mail and verify your connection as previously explained.
Adding an additional email
If you would like to add an additional account to the system, it is as simple as clicking on the plus icon that can be found at the bottom of the page. Then a new tile for the email entity will be visible on the page.
You can now add all your additional email credentials in the same way that you have inserted for the first account.
Deleting an existing account
Note
You can only remove additional e-mails; the main e-mail (first in the list) cannot be removed.
In order to remove an existing e-mail, you shall click on the remove
icon of the respective email that you would like to remove.
Once your email has been successfully added, you will need to click on
the Submit button at the bottom of the page and your changes will be
saved.
Outgoing Emails
In this page, you can define the email connection for all outgoing e-mails in the system.
Overview
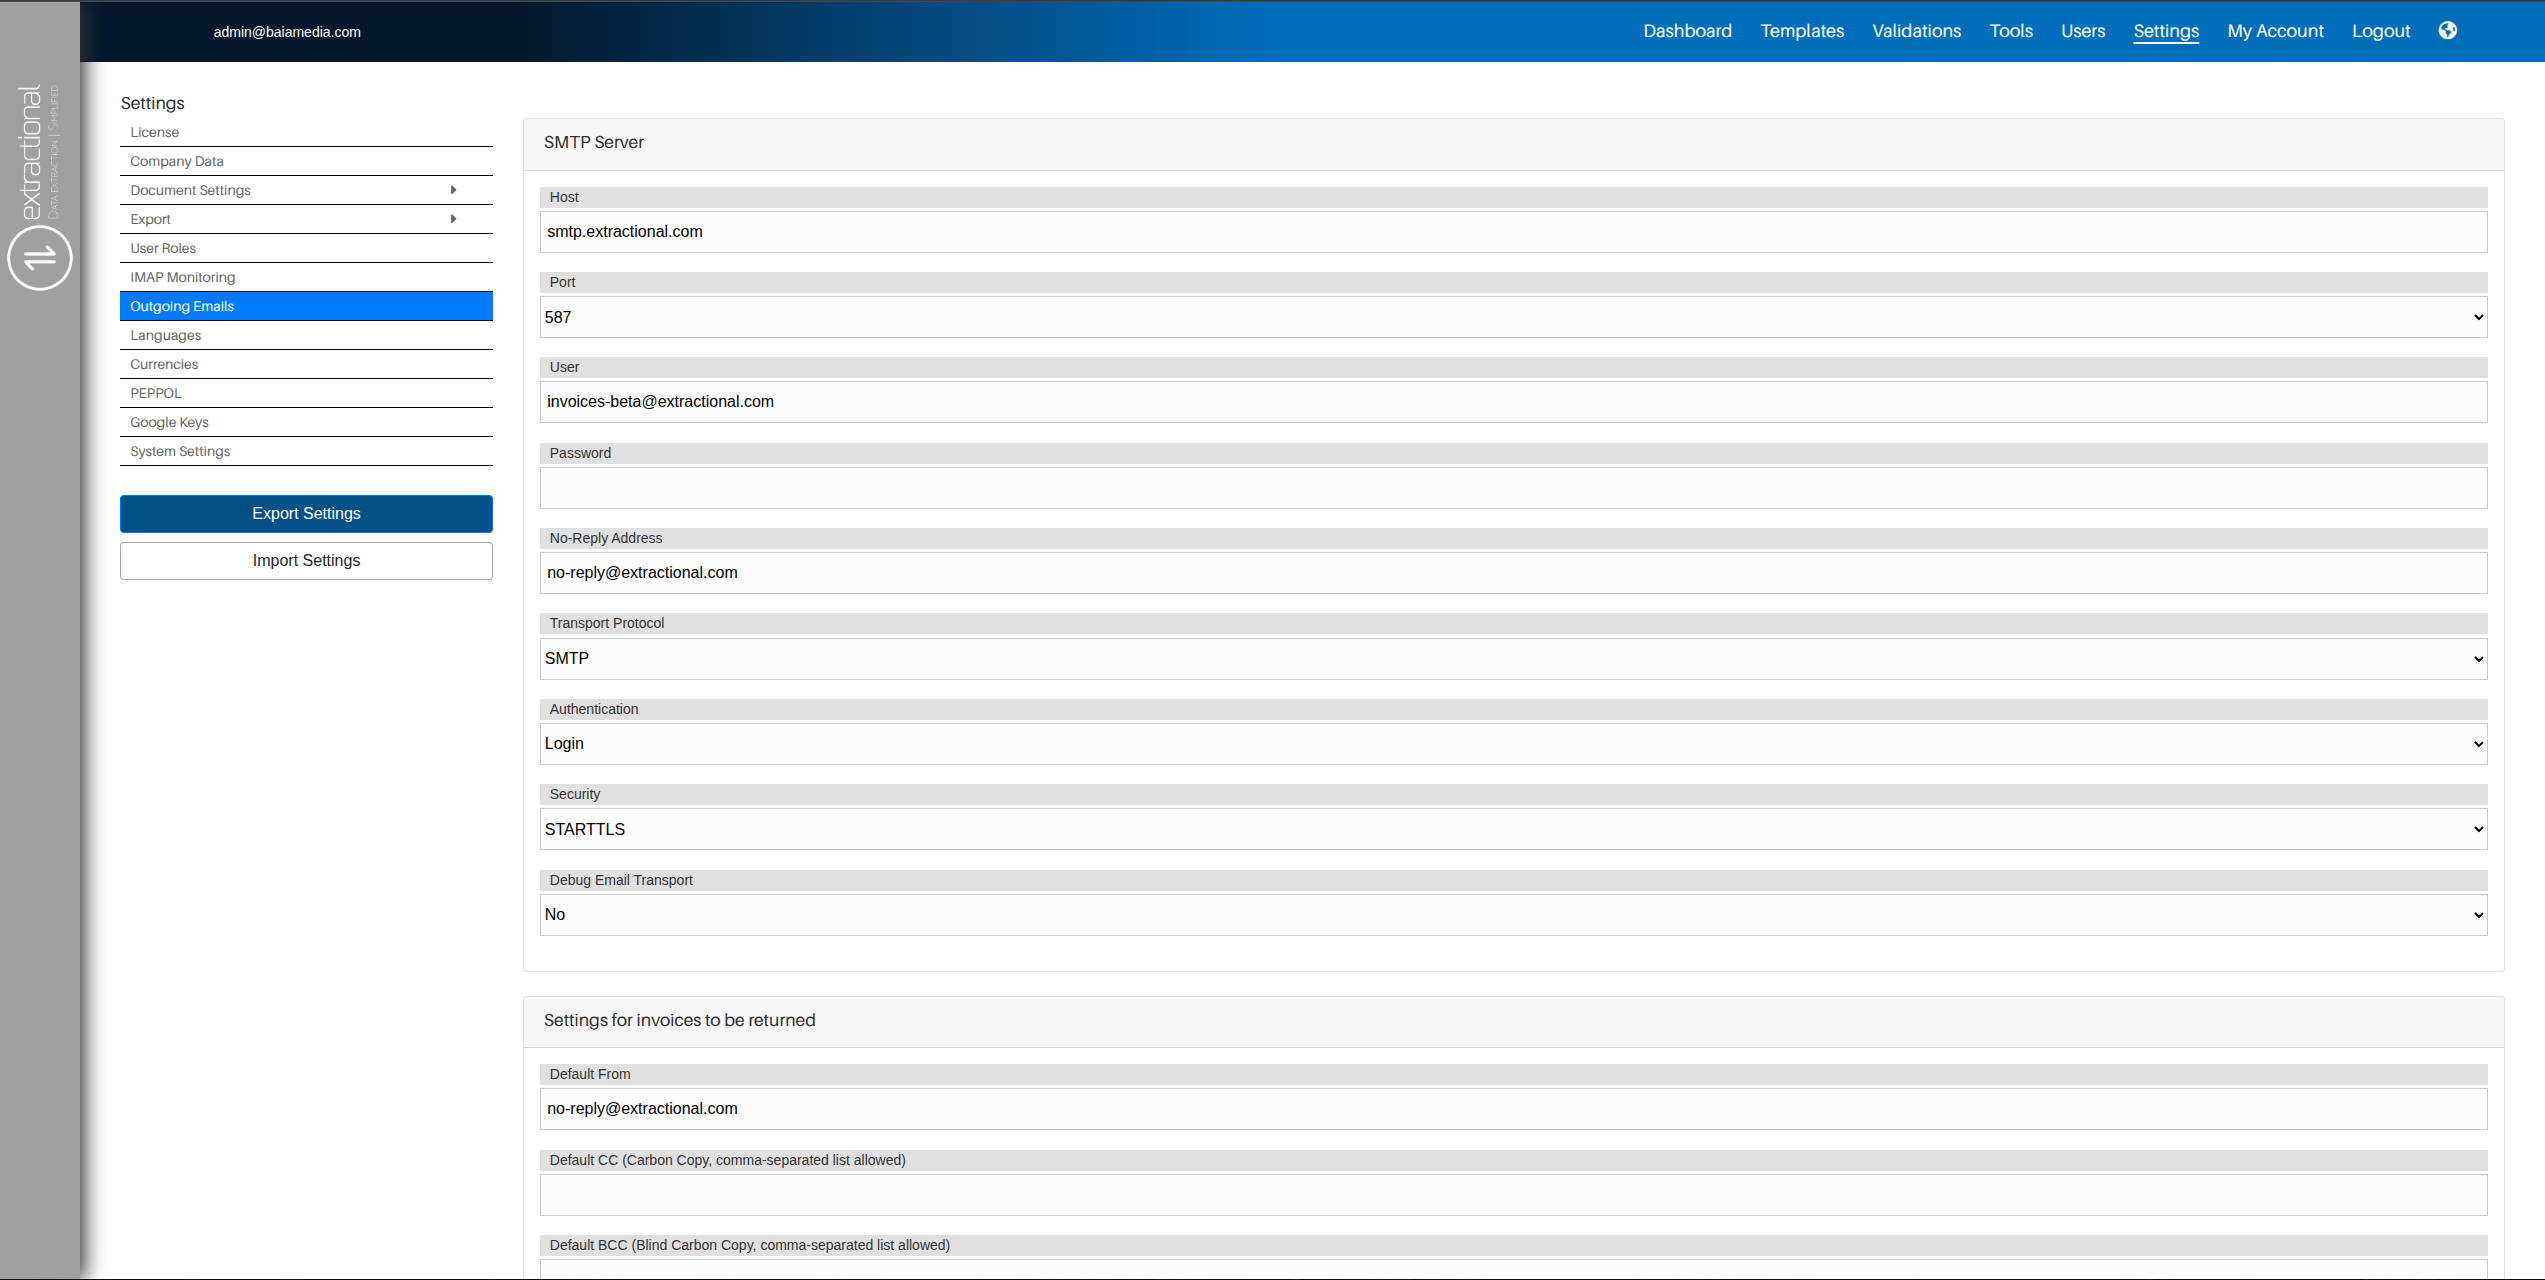
Setting up the email connection
Our system, in order to send emails with a given email, uses a SMTP(S) transport protocol connection.
Prerequisites
In order to realize this connection, you first need to make sure that your email host domain allows you to elaborate such a connection.
If you are currently trying to connect to an professional outlook account, please use the following paragraph that explains exactly how to establish a connection to a an outlook account.
Filling all your email's credentials
Now that you already know that your e-mail allows this type of
connection, you will only need to create fill all the different fields
in SMTP Server section of the page and your system should have a
successful connection with your email.
Please do not forget to save your changes by clicking on the Submit
button on the bottom of the page.
Outlook connection
Our system also provides the ability to connect your system to an
outlook account. In order to trigger the system that you would like to
connect to an outlook account, you will need to enter the Outlook's SMTP
Server smtp.office365.com in the Host text field and unselect the
respective field.
Once unselected, the system will represent some additional information that needs to be added in order to realise this more complex connection with Outlook's SMTP server.
The additional information that needs to be added is the following:
Once all the information has been added, you will need to save all the
changes by clicking on the Submit button at the bottom of the page.
Setting template for all returned invoices
Here, you will be able to define the main composition of the email that will be sent once a document is not accepted.
Filling all fields
The first part here will consist of filling all main fields as if where to send a normal e-mail, such as email sender, CC's, etc.
Creating the default body and subject
Once all the different fields have been completed, you will need to complete a default subject that shall as well as a default body.
Tip
If you would like to have a some identifying data, such as the invoice number or the name of the current user, you can always use the following replacing nomenclatures and this will automatically be done for you.
-
0 = Invoice Number
-
1 = Name of current user
-
2 = Email address of current user
-
3 = Text \" or phone \", followed by phone number of current user (will only be inserted if available)
Languages
In here you will be able to define all the languages that you want to be enabled in your system.
Overview
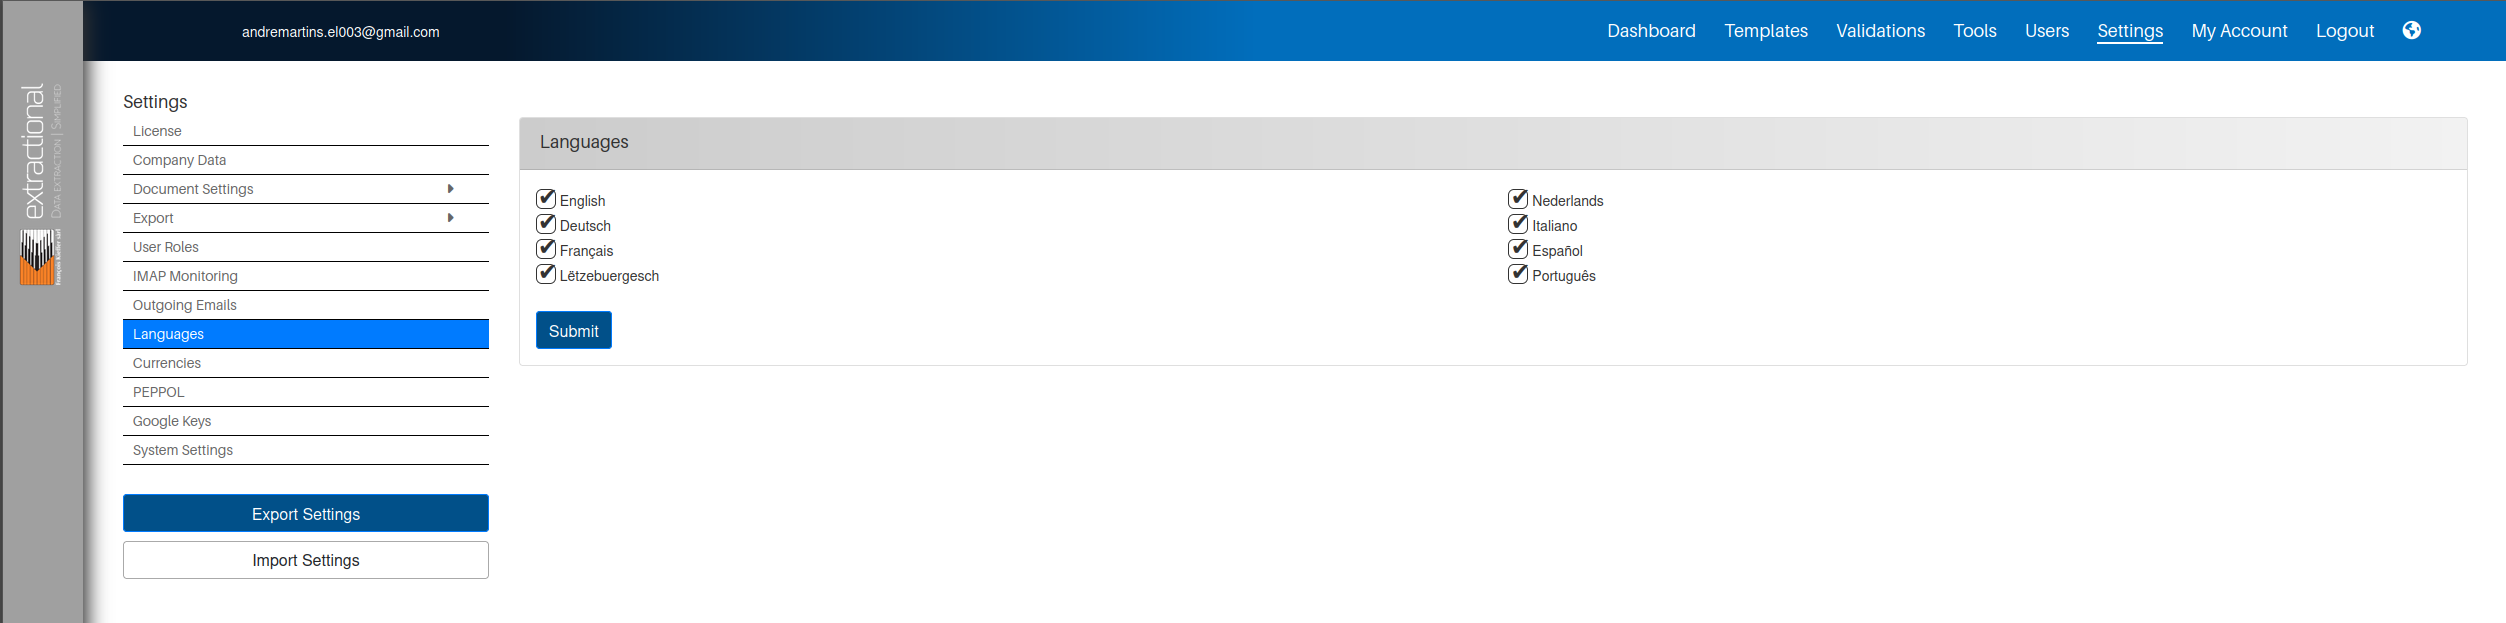
How to add or remove languages
Here, in order to add or to remove languages from your system, you will deselect or select all the respective languages. This can be done by simply clicking on the selective text boxes that are visible next to each language. All the languages that are selected will be available for usage.
Once you have defined your choice, you will only need to click on the
Submit that is available at the bottom of the page in order to save
your preferences.
Info
Please note that these preferences will be applied to all users, not just to your account.
Currencies
In this page you will be able to define all the conversion rates through in your system, this allowing the system to correctly converting the different currencies in the system.
Overview
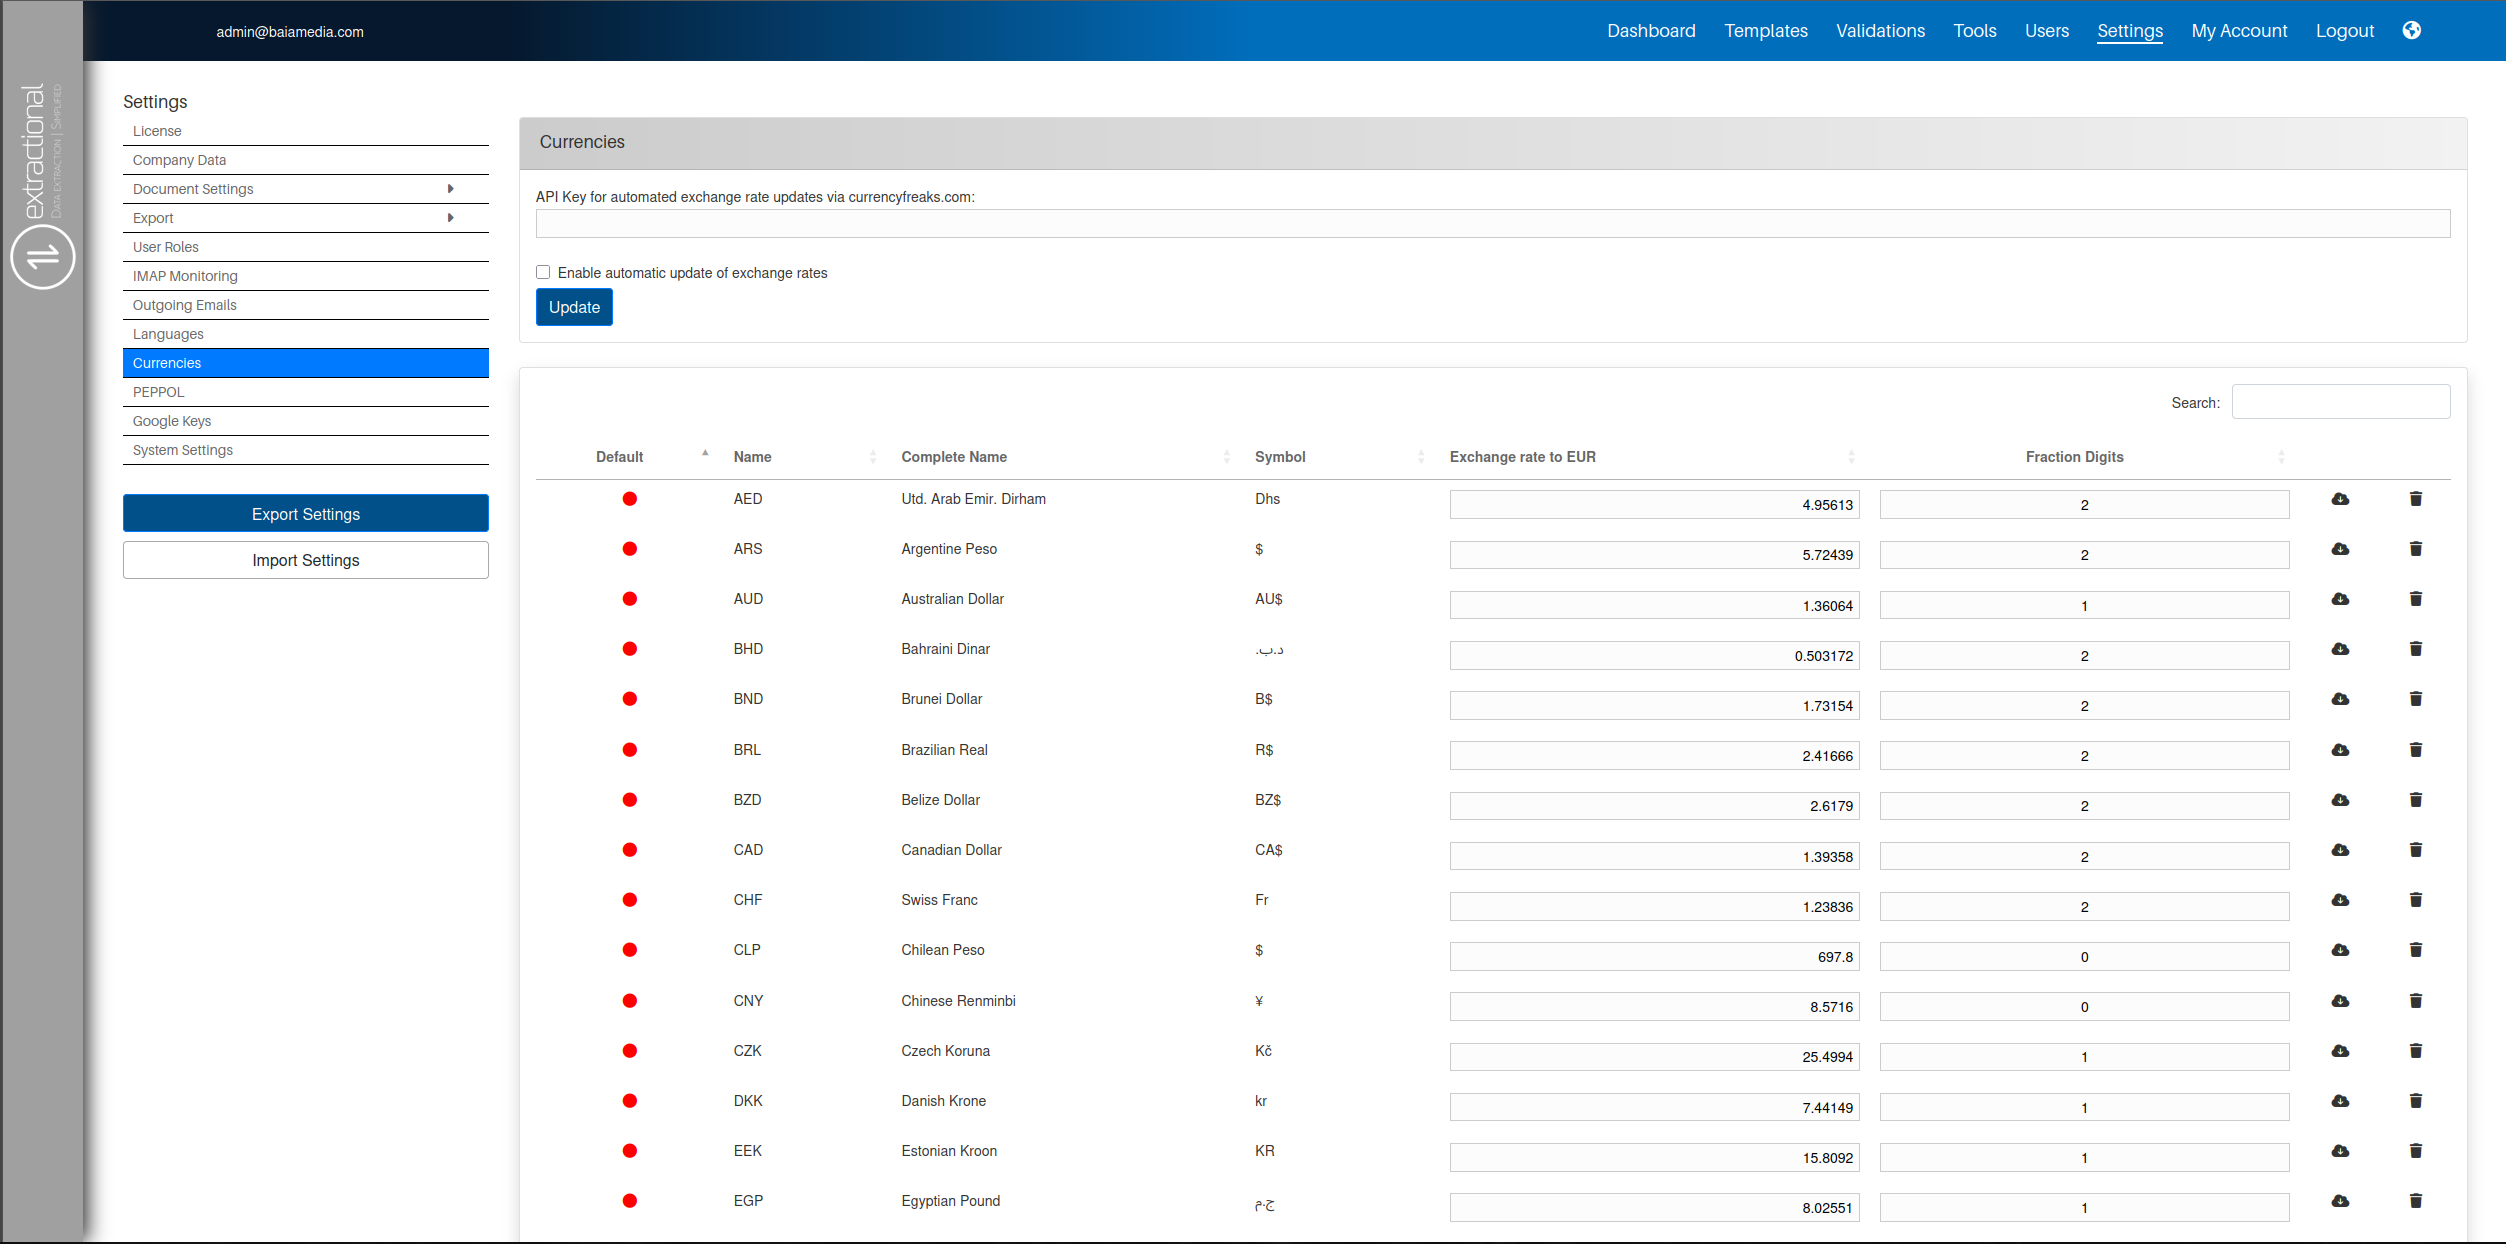
Navigation through this page
This page is composed of a window where you can establish a connection with the currencyfreaks.com API. YOu will also be able to define if you would like the to have the table updating automatically as well as manually update it.
How to use this page
In this section you will be able to learn how to use this page.
Adding an API key from currencyfreaks.com will allow you to enable the concurrency interchange rate to automatically update with the press of a button or even by scheduling the update.
Where to find the API key
In order to create a new API key you will need to create an account at the currencyfreaks website and and choose the plan that you would like to use (typically th free plan shall be more than enough for your needs).
Once the account is prepared, you will be able to generate API keys.
How to add it in our system
Now that you have one key, you only need to add it to the respective text field and click on the submit button.
In order to automatically update the rate table you will need to have an API key defined.
Scheduling the table updates
In order to schedule all updates, you will need to start be sellecting the respective box that is positioned above the Submit button. You will be then presented with the following additional information:

You will then be able to define the frequency of the updates. All the updates are always realized at midnight.
Once you have saved your preferences, you will need to click on the Submit button.
The navigation through the table is similar to all other tables in the system.
Defining the default currency in your system
In order to define the default currency in your system yo shall do it in the Default column.
The current default currency is defined with the green color. To define another one, you will need to click on the respective red dot.
Adding a new currency
In order to add a new currency in your system, you shall click on the Add... button at the bottom of the table and fill all the requested fields in that would be asked.
PEPPOL
In this subpage of the Settings page, you shall find all the PEPPOL specific settings.
Info
You will only need to use this page if you are would like to take advantage of all Peppol-compliant documents features.
Overview
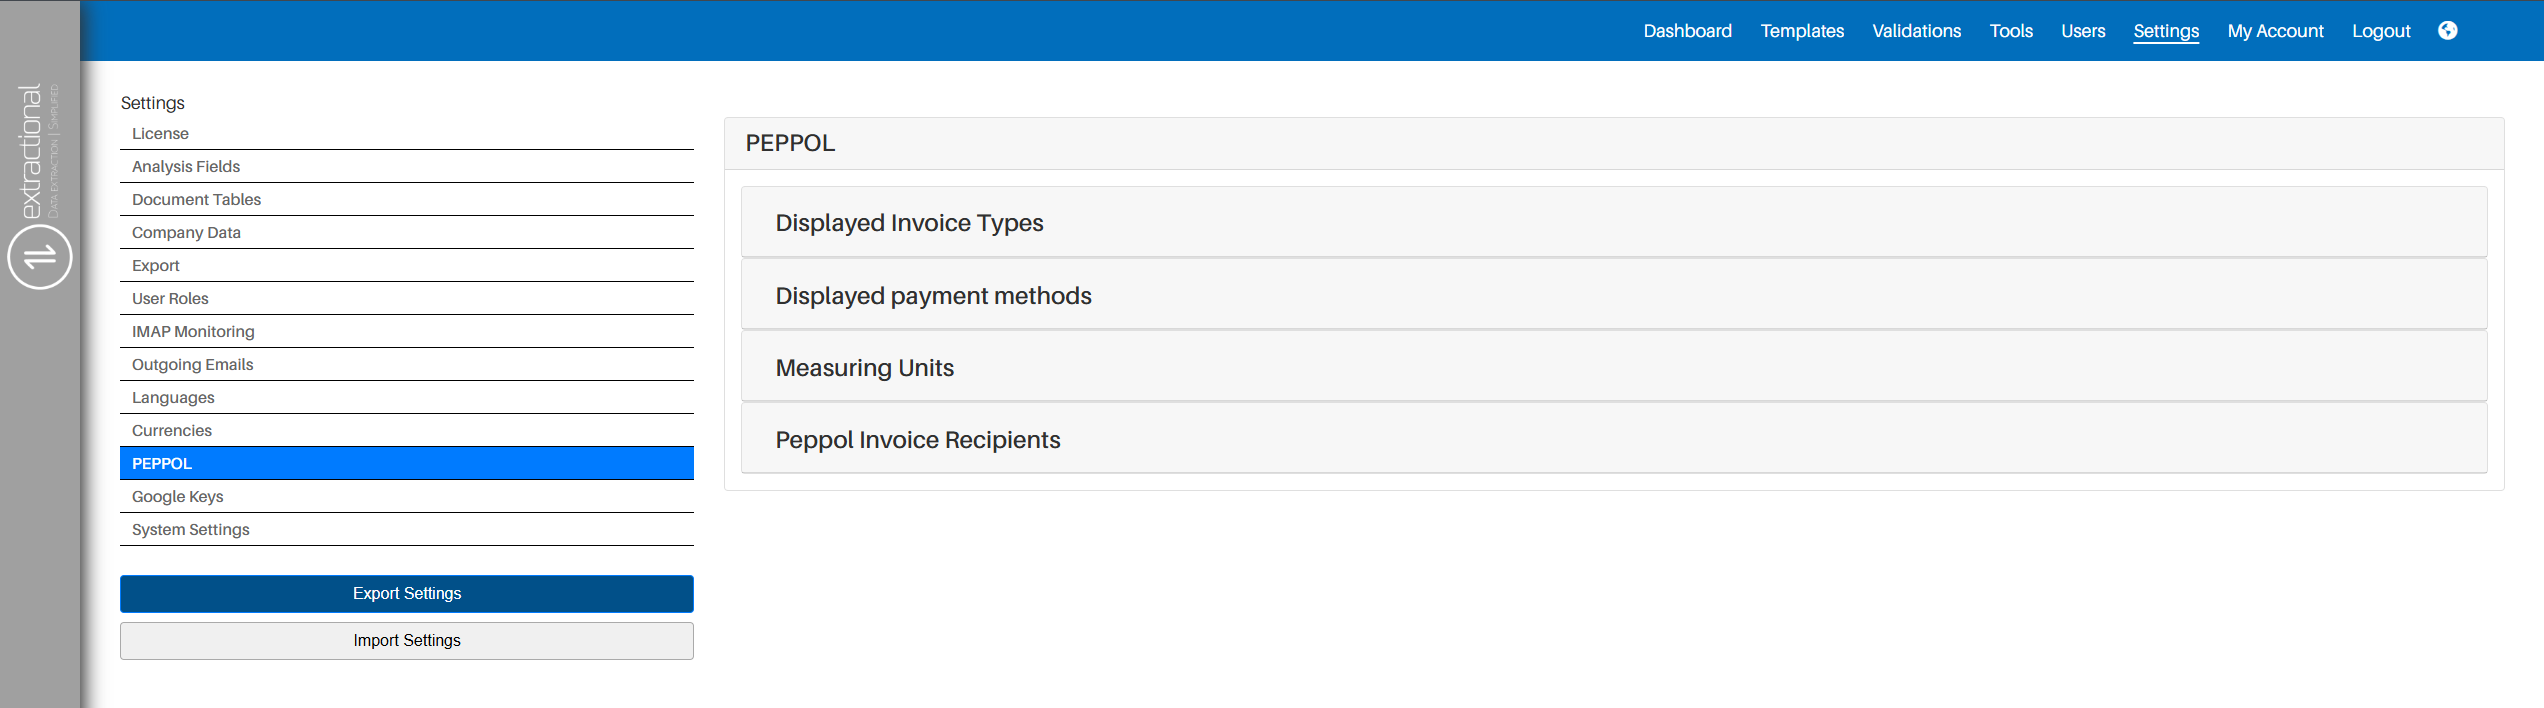
As you can see, there are four main menus that you can choose on this page. In the following sections, you shall find the respective guides on how to take advantage of each section.
How to use all the different menus
Displayed Invoices Types menu
The first menu that we will show will be the menu about where you will define all the types of Invoices that your company may use according to the Peppol standards.
To open this menu, click on the text field \"Displayed Invoice Types\", and your page should look something like this.

As you can see, there are many options that you can select in this section.
By default, all the options are pre-selected, this allowing user to not need to refine the system for usage. However, we highly recommend that you take a little time and define all the different options that will meet the needs of your company.
In addition, all the invoice types that will be left as selected will be the ones that will be visible afterward in the system.
If you would like to save the preferences that you have chosen, click on the submit button at the bottom of the page, and all of your preferences will be saved in the system.
Displayed Payment methods
For this second menu, you will find a similar user interaction with the first menu but instead of defining all invoice types, you will define all of the payment methods that fit your company needs.
For this menu, you shall select all of your preferences and preferably save them as explained in the previous section.
Measuring units
In this third menu, you will find a different menu compared to the previous ones. In this menu, you will define all the different units that shall be identified in your system documents.
Since Peppol has a large library of all the different measuring units possible, we have changed the navigation method to the one that you will find below.

There are two main things that you are able to each measuring unit.
The first thing you shall be able to do in this menu is to define if you would like to have that Unit available for extraction in your system or not. To do so, you will only need to (un)select the select-box of the measuring unit that is in question.
The second thing that can do is to add or remove Unit alias to a specific one. Before we start explaining how to add or remove alias of one unit, we will start by explaining you what we mean by unit alias.
One unit alias to a measuring unit in our system means that, this alias shall be directly identified as the measuring unit. To help you visualizing all the what a unit alias means, let us take the example of the unit "Piece". Generally, in most of documents, you shall find "UA" to identify this measuring unit but you may also find "Piec." or "Stück". In order for the system to recognize all of these different nomenclatures to the measuring unit Piece, you will need to add them as alias to that specific measuring unit.
Now that you now know what these Alias are, in order to add or remove alias for each measuring unit, you shall click on the edit button of the corresponding unit that you would like to edit. You will then need to add all of the alias that you would like to add the the text box.
Important
Please separate each alias with a comma only.
Here is an example of what this edit page should look like with already some alias inserted into it.
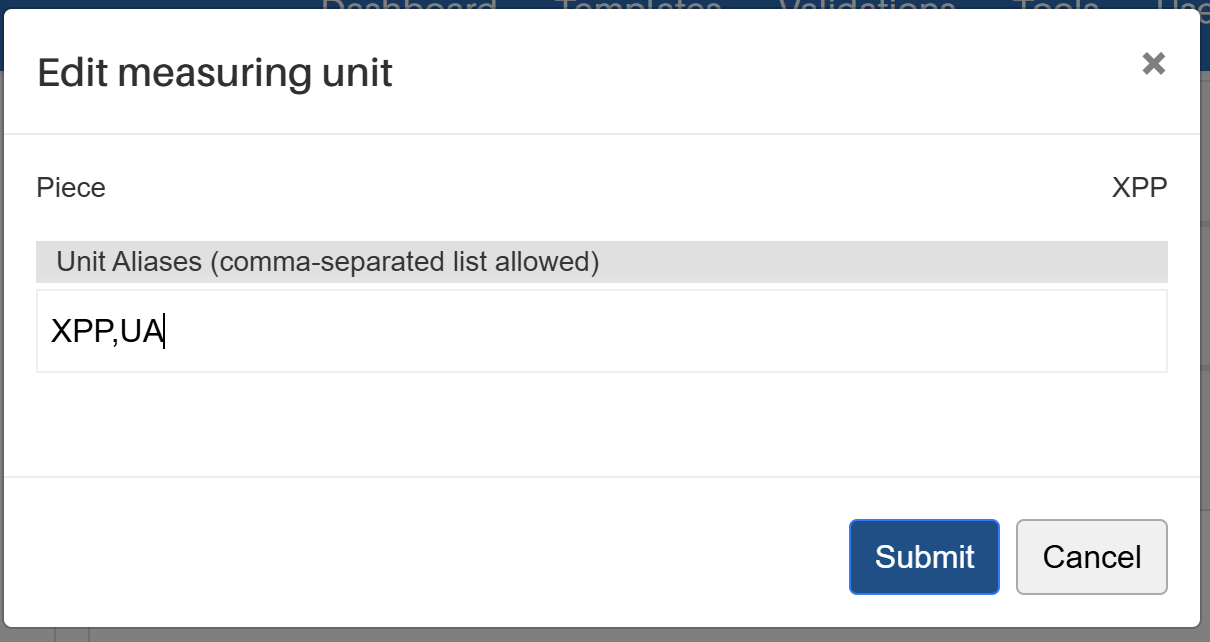
Once you have clicked inserted (removed) all the corresponding alias that you would like to have to your measuring unit, you will only need to click to the submit button on that specific page and all the aliases will be updated.
Peppol Invoice Recipients
In this part, you shall define all legal entities that shall be used for creating all of your Peppol XML invoices.
-
Editing your custumers
You can always edit your current customers by clicking on the edit button and changing all the desired data.
-
:fontawesome-circle-plus:{ .lg .middle } Adding new customers
Add more customers by clicking on the plus icon and define the new one. Our system also offers a database full of customers that could potentially already have yours.
Google Keys
This page allows you to automatically gather location information at each login entry attempt. To get the Google API keys, follow the Goggle tutorial explaining how to set it up.
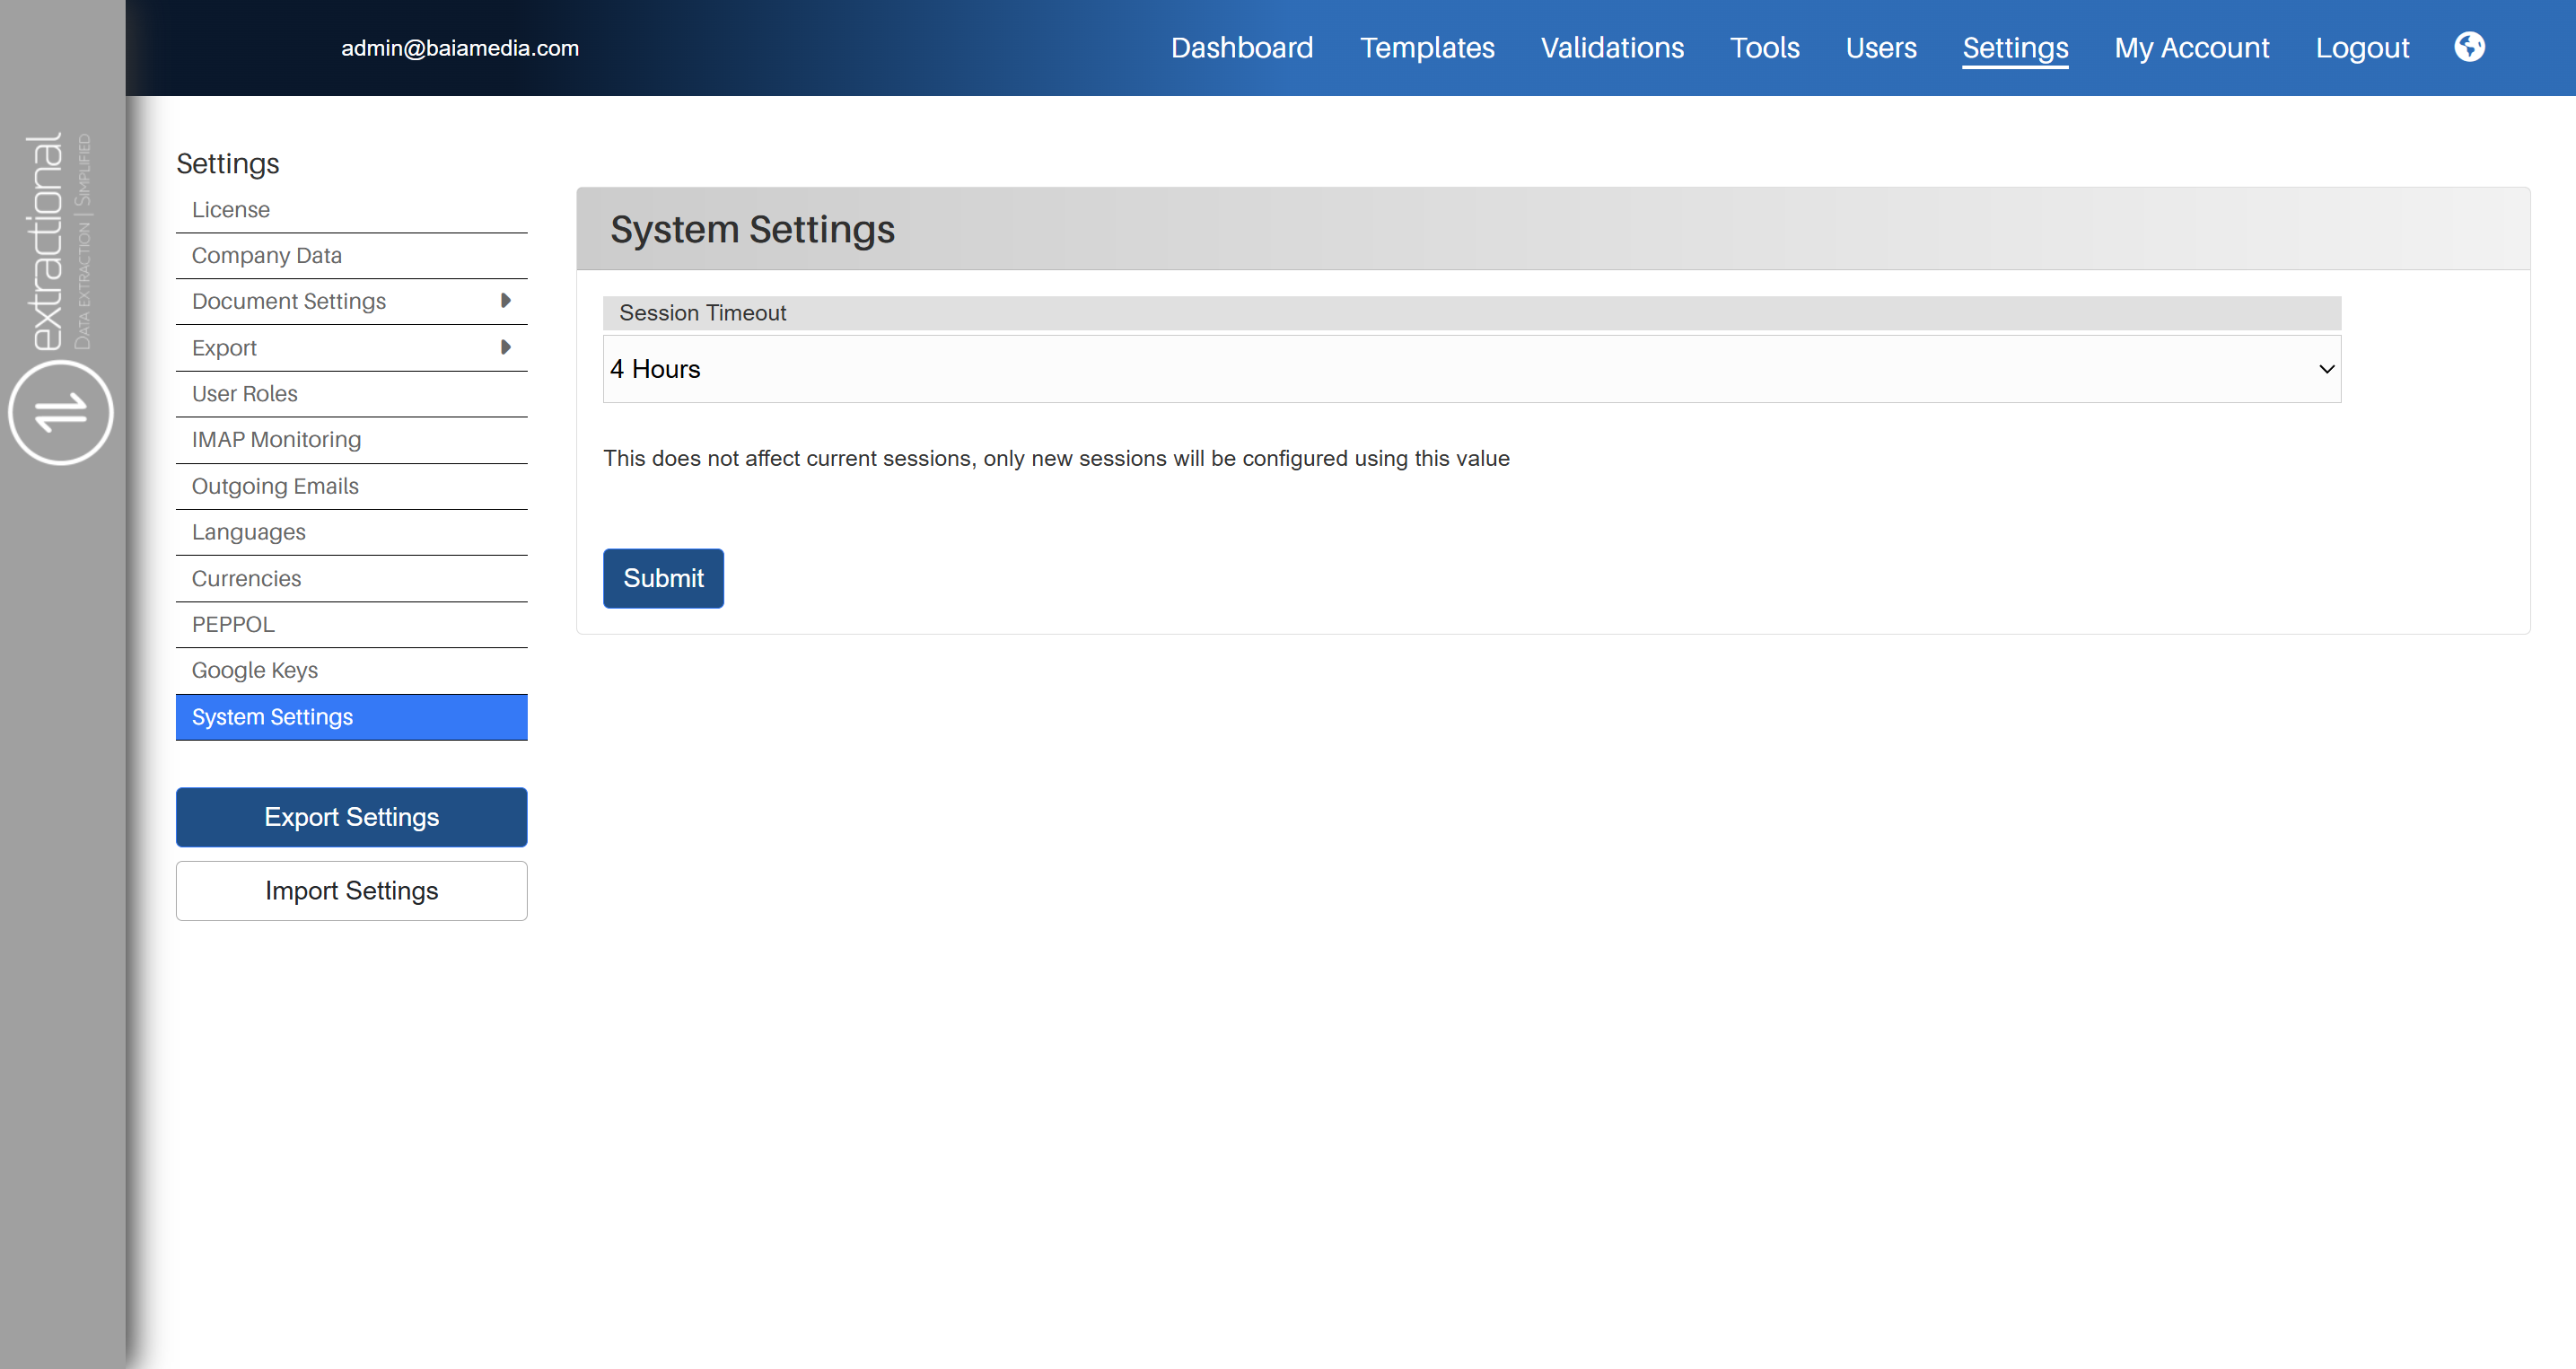
System Settings
In this page, you will be able to define all general settings of your system.
Overview
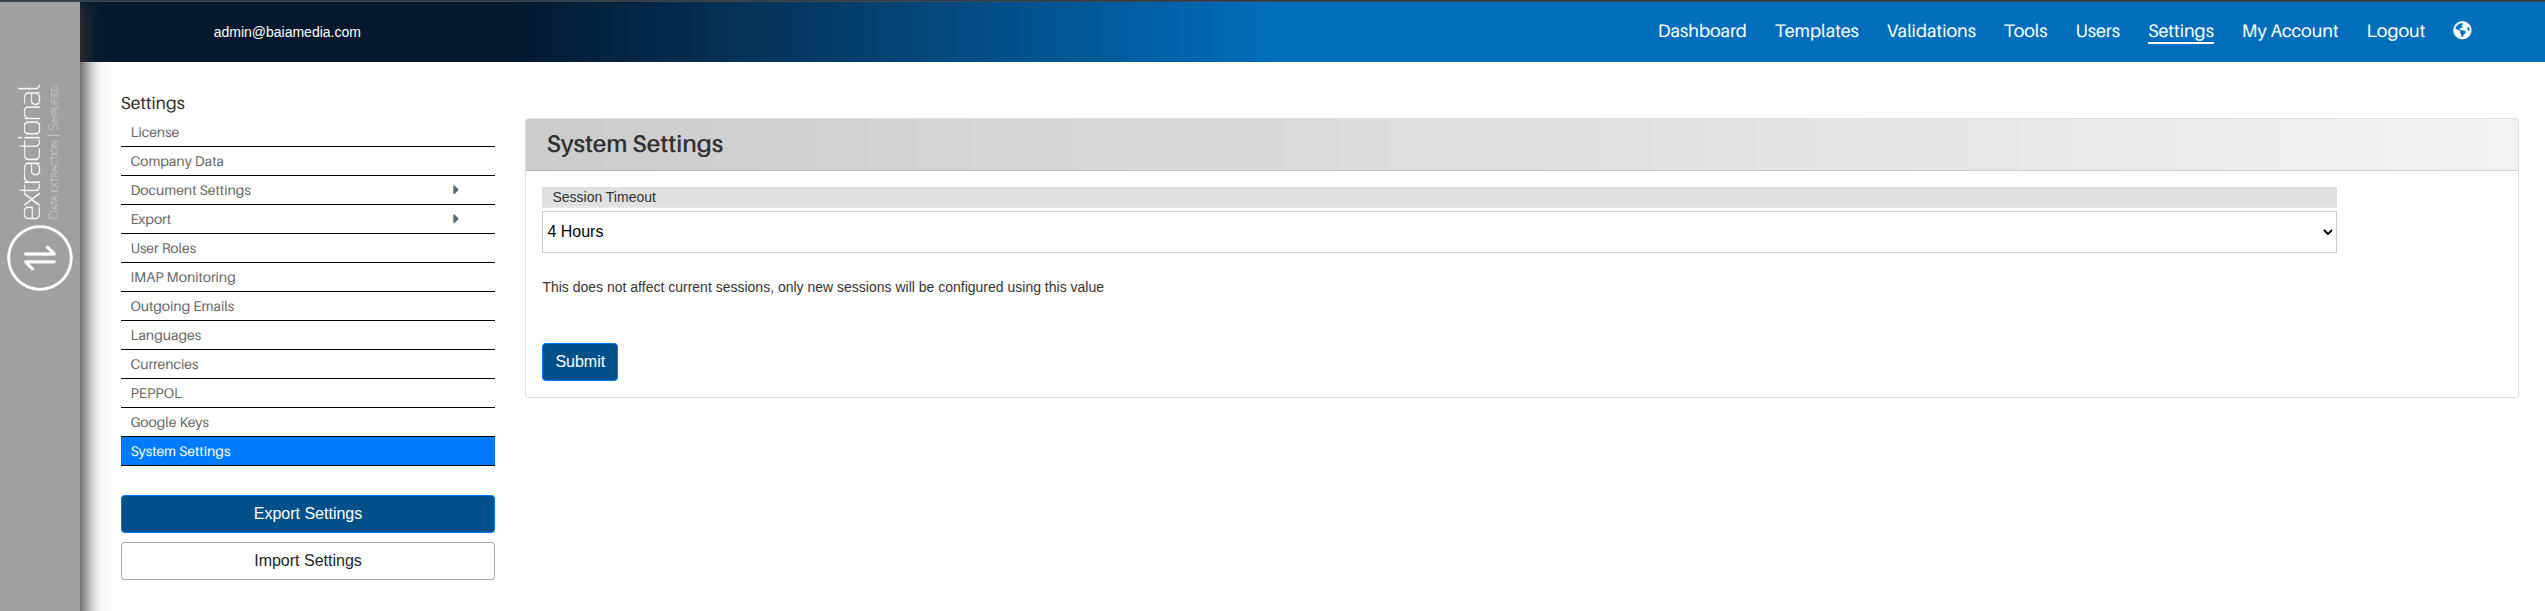
Defining a new time-out session
In this menu, you can define the duration for which a connected user shall be connected to the system without having to reconnect into the system.
To do so, you will need to click on the current timeout duration defined in the system and choose the new desired timeout duration.
After doing so, you will need to save your new preference by clinking on
the Submit button that can be seen at the bottom of the page.
Note
Please pay attention that changing the timeout duration will not affect current sessions, only new sessions will be configured using the new timeout session duration.