Secondary functionalities
Version: v2.0
Secondary Functionalities and useful Tips
In this section, we will show all the secondary functionalities; these however are as important as the main ones since these ones will considerably improve your workflow during the day.
Filtering function
Filtering can be helpful when trying to search for a specific document in your system or want to only treat a subgroup of all validations in your system.
To trigger this filter menu, you need to click on the \"Filter\" text that is visible on the main Validation page. After having clicked on the Filter button, your system shall look like this:

Now that you have opened the filter menu or can choose what to filter all the criteria as you would like as well as how the should be combined. You have two options on how to combine the filters, you can either choose the "and" or the "or" option in the combine filters with box.
Moreover, if you wish to remove all the filters, you can click on the
Reset text field that is situated right next to the Filter text
field and all the filters will reset to their default settings.
Changing timetable
One of the secondary systems on this page is also to define the time period of all the documents you wish to visualize. The tme period defines what documents are shown in the validation table. Additionally, the date referred in this context is the date regarding the entry of the document in the system.
Important
Extractional puts into consideration uses one of two distinctive dates to filter documents:
- Invoice date : Invoice date extracted from the device
- Reception date : Day when the invoice entered the system
These can be switched right next to the timetable selection tool:

This time period can be defined by simply clicking the date icon on the top right corner of the system, and you will be shown the following window to change the dates:

From here, you will be able to choose a new time period. You have two
possibilities on how to change the time period, the first one is by
choosing one of the options that is available on the left side of the
window (example: Last 7 Days). The other possibility is to
define a custom time period, this can be done by choosing the starting day
on the time period and left-click with your mouse and then choosing the
starting day end day of your time period and left-click with your mouse
again.
Once you are satisfied with your time period, you can click on the
Apply button in the bottom right corner of this window.
Important
Please be aware that the loading time can take some time, especially if there are a lot of files that need to be loaded into the system.
Usage of search bar
If you would like to quickly find a specific file, you can always take usage of the search bar.
How to use the search bar
To use the search bar, you will need to write some information of the
file that you are looking for in the text box that is next to the
Search text field.
Once you have entered some text in the text bar, teh system will perfom a search for all files contained in the current table. The system will look for elements where it can find the entirity of the information given.
Important
The only fields that are available for searching are those that have been set to "activated" or "hidden".
Once you have entered some text in the text bar, the system will look for any file that will containing some meta-information equal to the one you have just entered.
Please pay attention that the system will only look within all meta-information. In other words, all the information that can be seen from each in the main validation page.
Exporting Documents
In this part, we will discuss how to export documents in a chosen format.
There are two main ways to export documents, you have the possibility to export a single document or you can also export the entirety of the current table that is represented.
Important
Be aware that all documents that you would like to export must be released, and if you choose to export in CSV or XML format, the format must also be defined in the settings. More information about exporting formats in the following link (STILL TO DO).
Exporting a single file
To export a single document, you will start by viewing the file that you would like to export.
The exporting section can then be found at the bottom of the data collection window. The section shall look like this:

In this section of the page, you will be able to define the export format that you would like to perform and click on the submit button.
Improvement of Workflow
In this part, we will talk about to main points featured in our system that will allow you to improve your workflows.
Usage of Flags
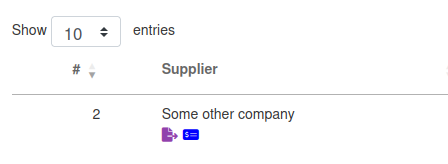
Our system uses flags allowing us to define the state of a certain validation. All flags have an associated icon and will be visible in each validation under the supplier box in the document itself. Here is an example of a validation already with two flags associated with it.
How to take advantage of flags
Flags allow every user to quickly understand the state of an existing validation. They can also help you understand if a certain task has already been done in a validation.
Typical flags in the system are:
ExportedPaidetc.
Quickly execute operations for one document
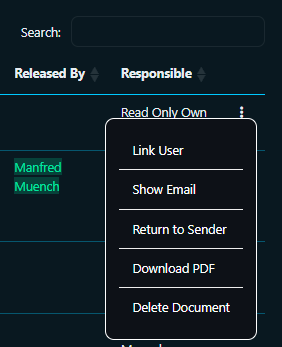
Our system also provides you with the possibility to easily execute operation to a single document. This can be done by clicking on the option icon in the respective validation (visualized with a three points at the right corner of the validation row) and select the desired action that you would like to do.
Quickly execute operations for several documents
In addition, our system also has a method implemented allowing to execute general operations to several documents at the same time. This, again will allow you to improve the efficiency of your workflow.
To use this feature, you will select all the documents that you would like to review followed by selecting the operation that you would like to do on button's panel situated at the top of the validation's table:

Note
If you chose to open several documents at the same time, you will be transferred to the view page as if it was for only one document, but this time, you will have all the selected files represented on the top as if they were tabs in a browser.
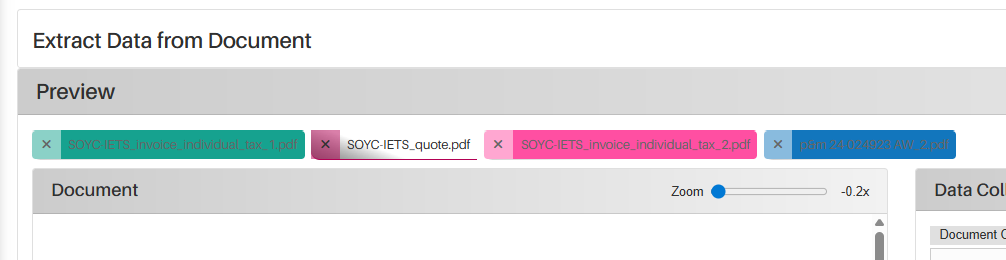
In addition, each tab's color also represents the document's state with the same colors as in the validations table.
Now you can quickly review all the desired files without needing to always go back to the main page.